How to Track Midseason Transfers on Your WordPress Sports Site

As sports fans know, part of the thrill of the game is the unexpected. The underdogs coming from behind for a win or the midseason transfer of your favorite player, for example.
Midseason transfers can be frequent depending on your sport and SportsPress Pro has made translating this particular surprise a breeze. You can easily alter a player’s team midseason as well as the stats they accrued.
Today, I’m going to show you how to use the SportsPress Pro Midseason Transfer feature to accurately reflect the statistics of the player’s season, automatically update adjusted player statistics accordingly as well as share unique ways you can announce the transfers to your fans.
SportsPress Pro for the Win
SportsPress is WordPress’ most highly-regarded plugin for sports teams and other athletic organizations. It’s a comprehensive software that effortlessly displays, calculates and showcases everything a fan needs to keep up with the team.
It’s also trusted by over 20,000 teams worldwide.
For a plugin with more dynamic functionality, SportsPress Pro is a fantastic option. It has automated calculations, tournament brackets and sponsor modules to really make your sports website stand out.
You can also make your sports site look more eye-catching and professional than many national leagues. How? By pairing SportsPress or SportsPress Pro with one of the available sports themes by ThemeBoy.
The Midseason Transfer feature is only on SportsPress Pro so if you’d like to follow along on this tutorial, you’ll need a copy, which you can get on the ThemeBoy website.
Gearing Up
Before we get to the fun stuff, it helps to have a website already set up with players, teams, events and statistics already inputted so you can properly use the transfer functionality.
For details, check out How to Create a Sports WordPress Website for Any Sport, Does Your Sports WordPress Website Really Need SportsPress Pro? and How to Integrate SportsPress into Any WordPress Theme.
It’s also best practise to make a full backup of your site before making any changes. That way, you can quickly restore your site and reverse the errors if you make a mistake.
For details, check out WordPress Backups and How to Backup Your WordPress Site (Manually or Via Plugins).
Getting Into the Scrum
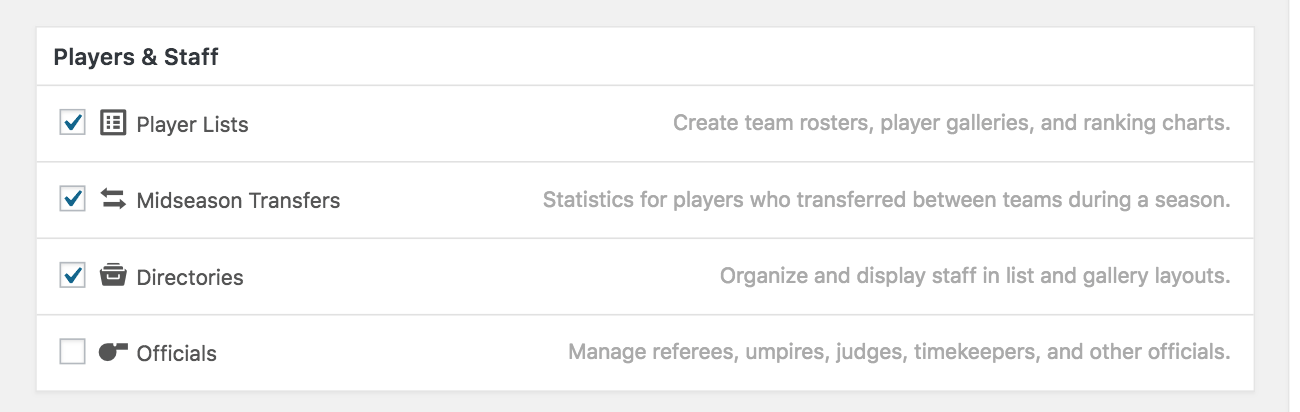
To start off, you need to enable Midseason Transfer functionality by going to SportsPress > Settings or a custom name if you’ve changed your admin menu using the step in Customizing the WordPress Admin with Your Sports Branding.
Scroll down to the Players & Staff section and make sure the Midseason Transfer box is checked. If it isn’t, the necessary buttons won’t appear.
Setting up the Transfers
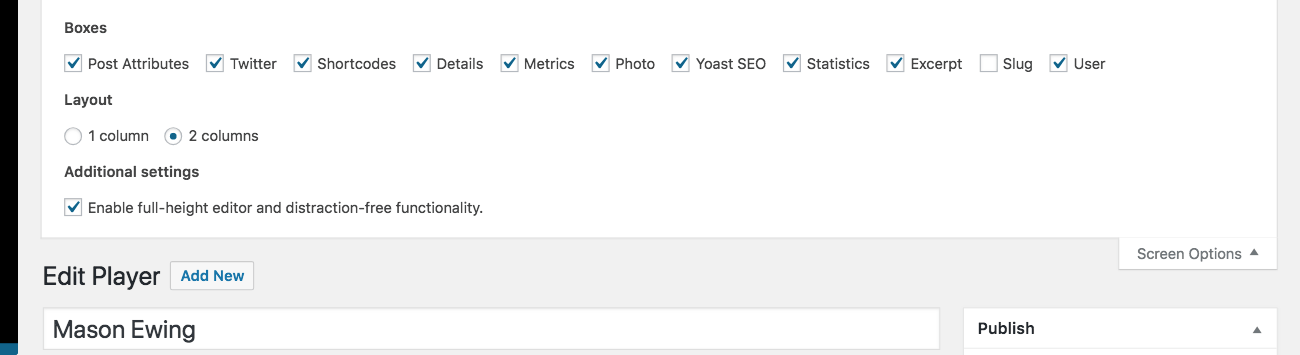
To record a midseason transfer on your website, go to Players in the admin dashboard menu and click on the name of the player who was transferred. This will bring you to the Edit Player page.
Scroll down the page to find the Statistics module. If you don’t see one, go to the Screen Options panel at the top of the page and make sure Statistics is checked.
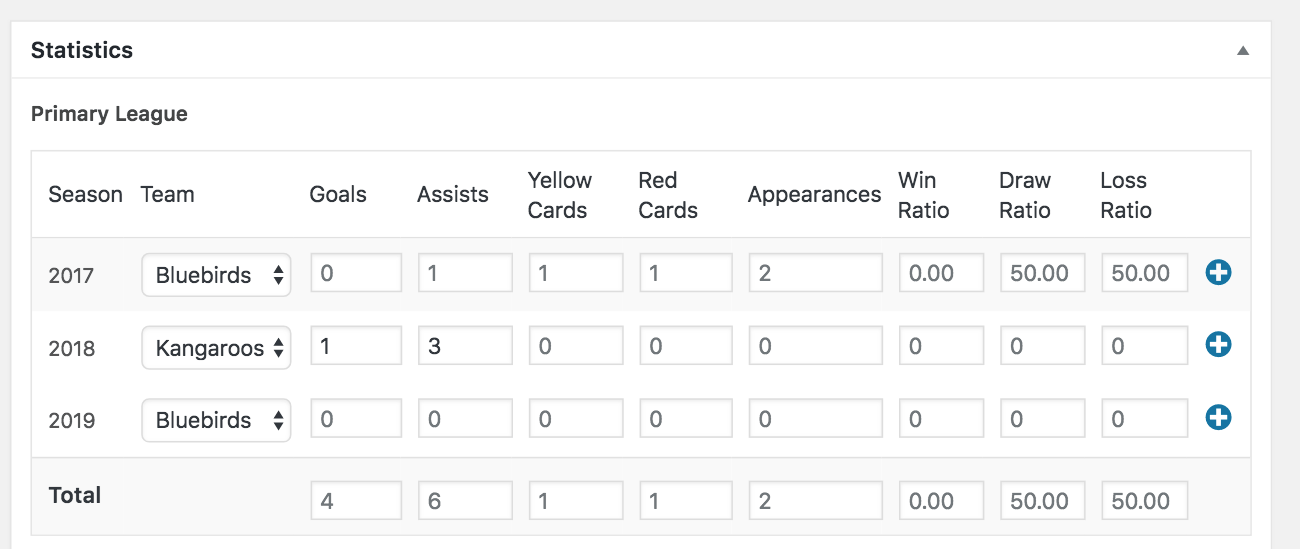
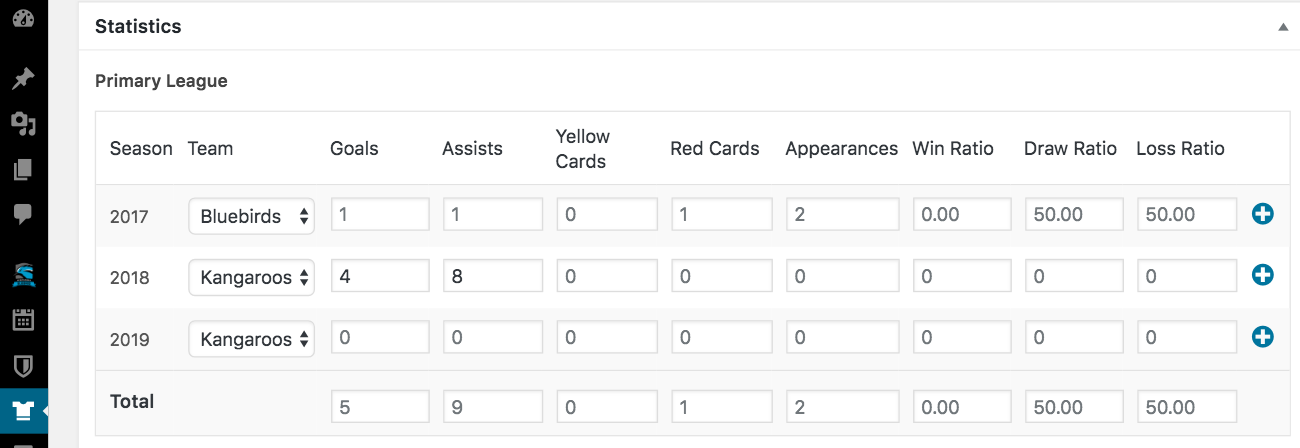
In the Statistics panel, there should be a set number of rows for each year that the player has been on a team. Stats have been inputted and automatically calculated by SportsPress at the bottom in Total.
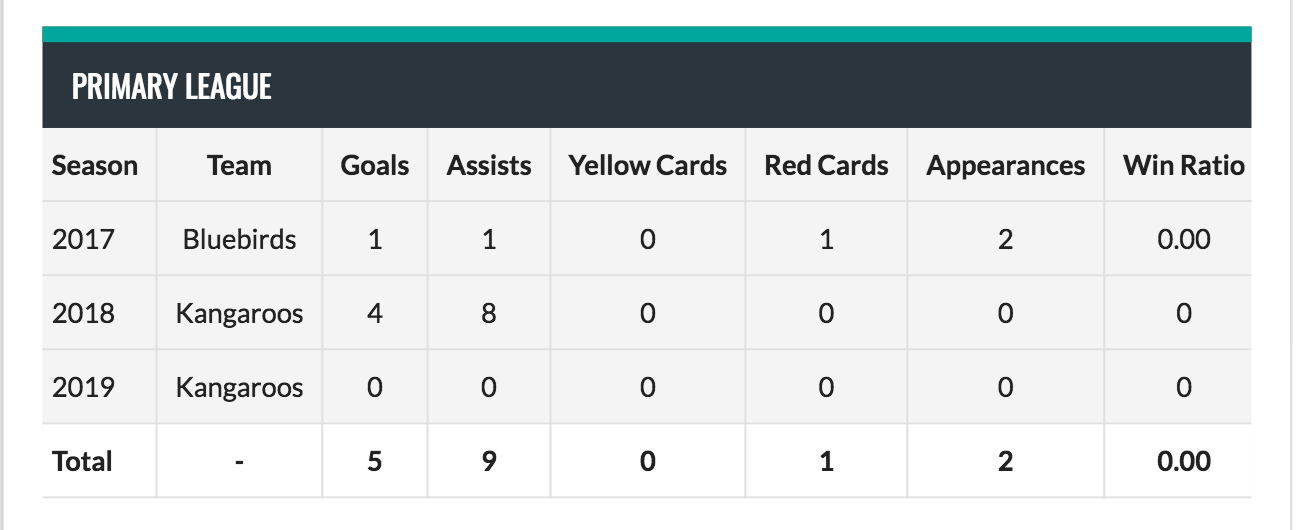
The front end of the player profile page mirrors the statistical module.
Transfer Away
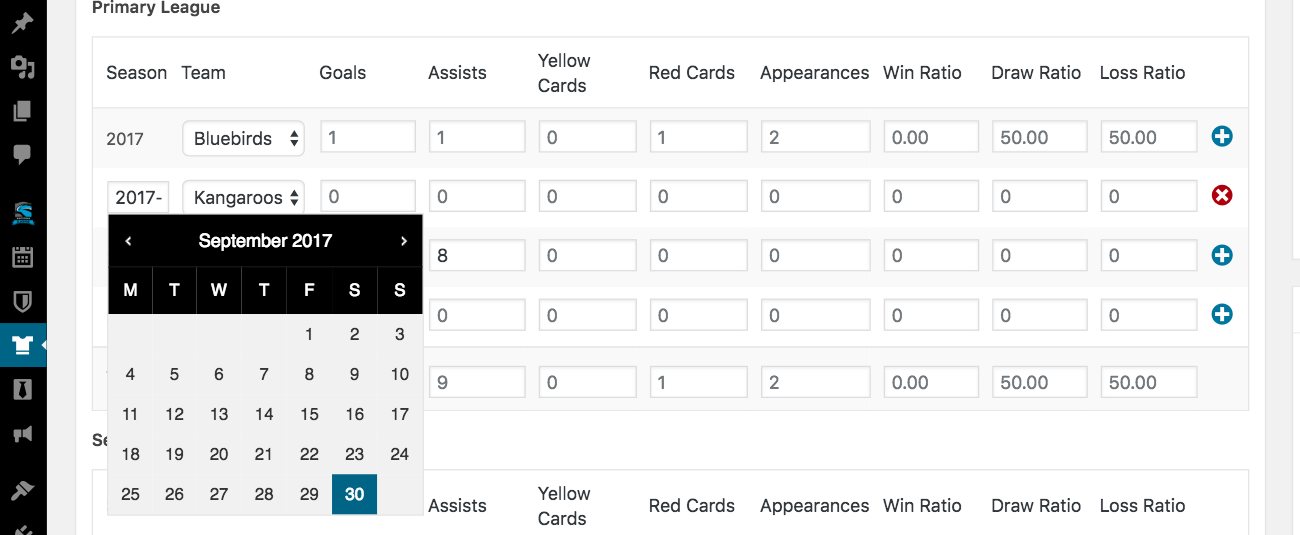
To input a transfer, select the blue “plus” button on the right side of the year the transfer occurred. An almost-identical new row will drop down with the same team name, but a blank date on the left and a red “X” button on the right.
Click on the date box and input the date the transfer occurred. Also, you can toggle the team name to properly display the team to which the player was transferred.
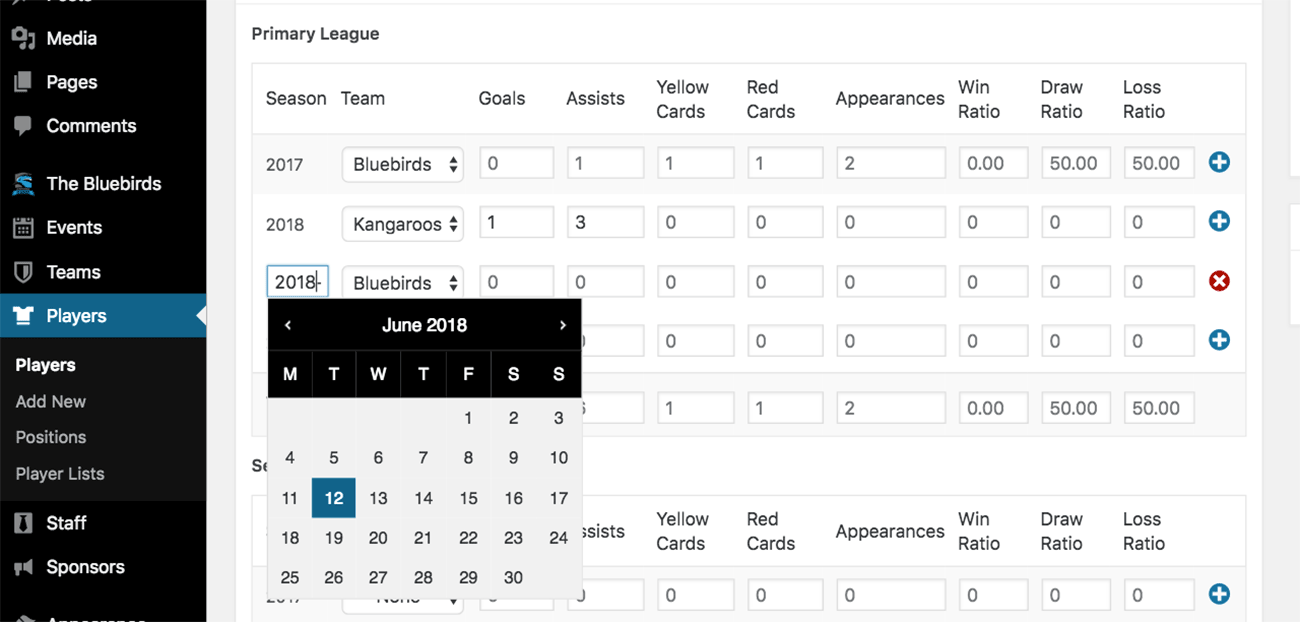
Once you click update, the player statistics are automatically re-calculated and adjusted based on the transfer date.
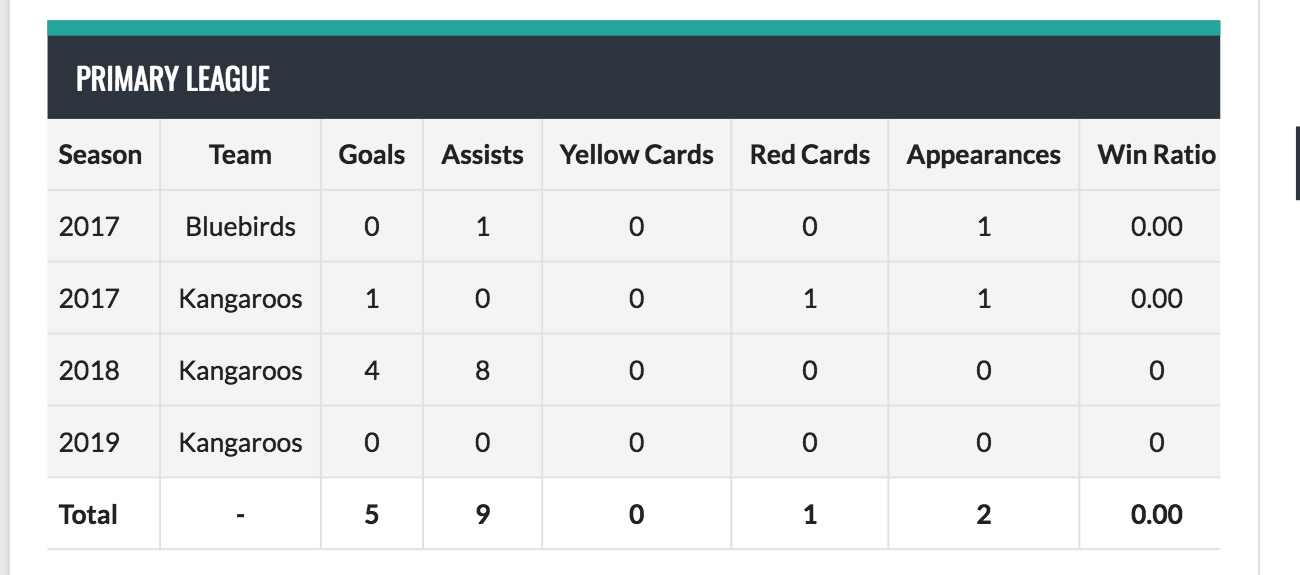
Next, go to the player page to check out the new and improved stats table. The stats will be distributed among the teams depending on when the transfer occurred.
Automatic Adjustments to Midseason Transfers
As previously mentioned, one of the neat parts of the midseason transfer feature is the automatic recalculation of stats based on the dates the player was transferred.
There’s no need to look back in the books and determine what points were actually scored and when because SportsPress has got your back.
For example, let’s say this player – we’ll call her Abby – transferred from the Bluebirds to the Kangaroos in the middle of 2017.
Abby’s statistics currently appear as follows in the screenshot below.
However, she transferred to the Kangaroos mid-2017 and so we’re going to initiate a midseason transfer using the module.
When we change the date that Abby was transferred, August 1st, and then click update on the page (this is important, the data does not refresh instantly), SportsPress distributes her stats across the different teams based on her transfer date.

However, if Abby was transferred at the end of September, her data would appear differently because the goals she scores and the assists she made all occurred while still with the Bluebirds.
SportsPress makes it easy for you to input your basic team data and statistics, then head back to what’s most important: the game.
Announcing Midseason Transfers
Now that you have input all the data, it’s time to let the fans know. Whether you’re welcoming a player onto the team or bidding farewell to a beloved asset, you can announce it in style with a number of SportsPress features.
So, below are some ideas for spreading the word and keeping everybody up to date.
Announcement on a News Page
What better way to announce a new acquisition than at the top of your news feed? WordPress initially was a blogging platform and while it has many more uses besides that now, the functionality still exists.
If you don’t already have a page for updates and new posts, utilizing the WordPress blog is a great way to keep updates organized by date and even categorized using tags.
Create a new page and name it “News,” “Updates” or whatever name you prefer. Just be sure you click the Publish button.
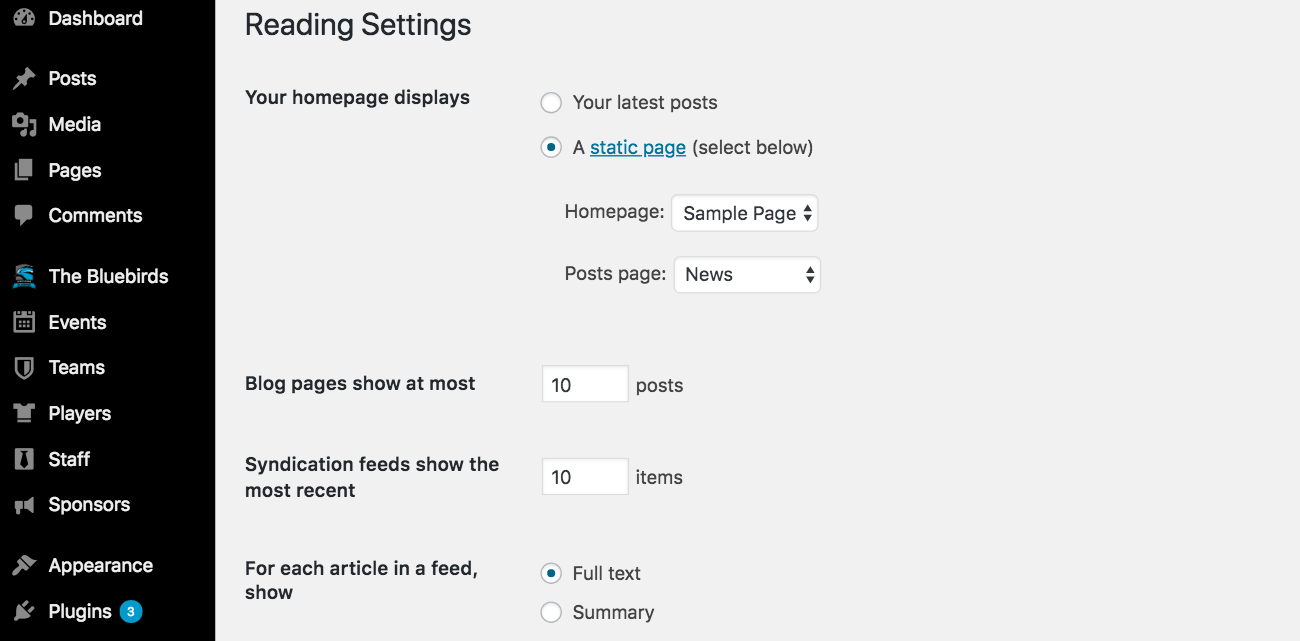
Next, assign that page as the “posts page” in WordPress’ template structure so it knows to run the post loop and display all the blog posts. Go to Settings > Reading to find this option as well as a number of other blog page settings.
At the top of the page, there’s a drop down labelled Posts Page and you’ll want to select the news page you created that should be in the drop down.
For efficiency’s sake, you could even design a specific post template or draft for every time a new player comes onto your team using shortcodes.
On every Edit Player page, there are two shortcodes that correspond for the player details as well as their statistics. After you have created a new profile for your player, drop whichever shortcode you prefer into the post content box on the Add Post page and the player’s profile will appear in the blog post.
For more information on how you can customize player profiles, check out How to Create Exciting Player Profiles on Your Sports Website.
Multiple Blogs on a Single Install
If you already have a blog set up and you don’t have Multisite set up, there’s a workaround you can use to create an additional blog, of sorts, for news and updates.
For details, check out How to Create Separate Blogs on a Single WordPress Install.
Front Page Feature Widget
If you don’t have some sort of way to display news and aren’t interested in developing one, another idea would be to have a section showcasing the news on your front page. This can also be done with a shortcode, but it’s probably most efficiently accomplished using a widget.
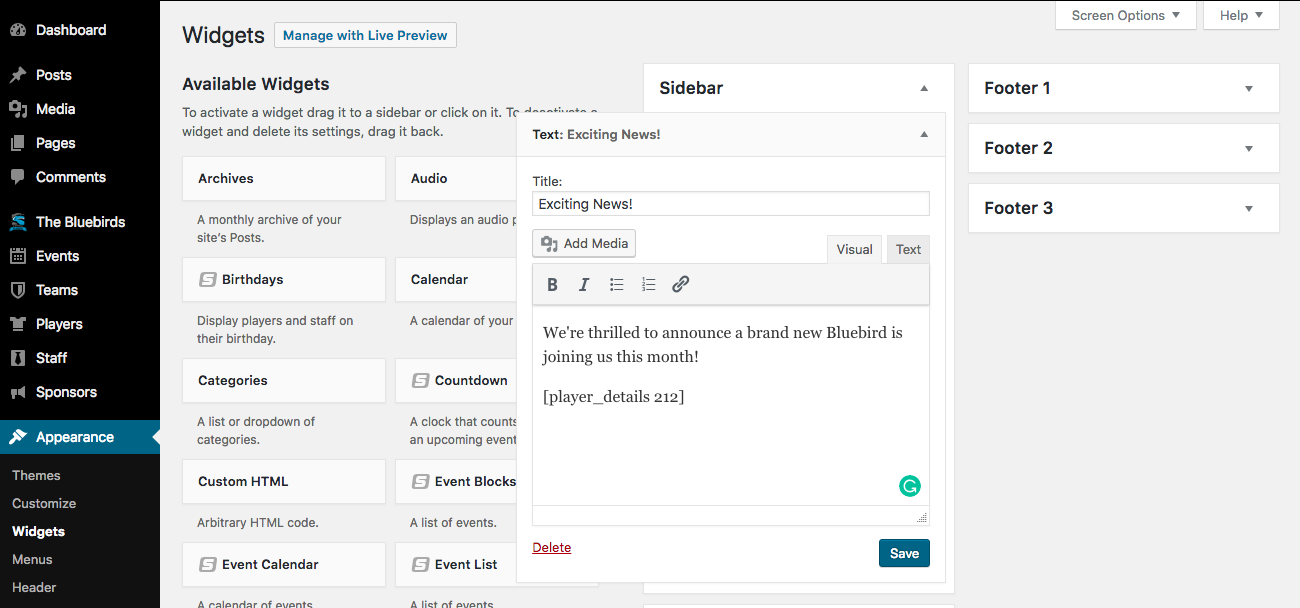
If you go to Appearance > Widgets, you should find a core WordPress Text widget that you can paste a shortcode into.
Then, place the shortcode into any of the widget areas your theme offers.
Finally, place text around the shortcode to frame the profile however you want.
There are a number of different ways to shout from the rooftops and exclaim how excited you are about a new player. When you are, your fans will be as well.
You can display player details with the [player_details id=”#”] shortcode or player stats with the [player_statistics id=”#”]. Just be sure to replace # with the actual ID number of the player.
For details, check out How to Use Shortcodes in SportsPress, Shortcodes, Player Details Shortcode and Player Statistics Shortcode.
The Final Inning
Midseason transfers don’t have to be precarious because you now have a better idea of how to deal with the unexpected when it comes to your team website.
Make sure everything is in the right order and let SportsPress Pro take care of the rest. Now back to the game!
Do you have a lot of unexpected player shifts in your league? What other statistical refining would you like to see in SportsPress? Let us know over on Twitter and Facebook.
