Displaying a Head-to-Head Match and Play-by-Play Timeline

Looking for creative ways to showcase athletic events on your WordPress website? Whether you’re gearing up for a head-to-head match or breaking the game down with a play-by-play timeline, these SportsPress features will get fans pumped.
In this post, we’ll take a look at the Next Team league table preset and the commentary-style vertical game timelines as options to spruce up your event page and keep fans engaged.
It’s the Way to Go
SportsPress is the premiere WordPress sports team plugin designed to make creating an athletic online presence a cinch.
It’s chock-full of useful features like automated statistics, and player rosters and profiles. The sharp and professional displays can also be personalized to your brand colors.
Check out a number of teams and organizations who have all chosen SportsPress as their WordPress athletic plugin.
If you would like more supercharged features and functionality, SportsPress Pro has everything from tournament modules and results matrices to midseason transfers and countdown clocks.
Step up your game by checking out SportsPress Pro.
Hold Your Horses
Before you get started implementing these exciting features, you need to make sure you have all the necessary components. Make sure you have a copy of WordPress installed on your site as well as the SportsPress plugin and theme. ThemeBoy has a variety of options to choose from if you want a theme that’s super-compatible.
If you want to use the vertical play-by-play timeline feature, you’ll need a copy of SportsPress Pro, which you can find on the ThemeBoy website.
Getting to the Match
It’s also a good idea to have your website already set up with team, player and event data already added. Check out How to Create a Sports WordPress Website for Any Sport for details.
Today, I’ll be using football (soccer) terminology and scoring as examples to help illustrate how to use the Next Team Column feature to showcase a head-to-head match as well as the vertical timeline feature to display a play-by-play timeline.
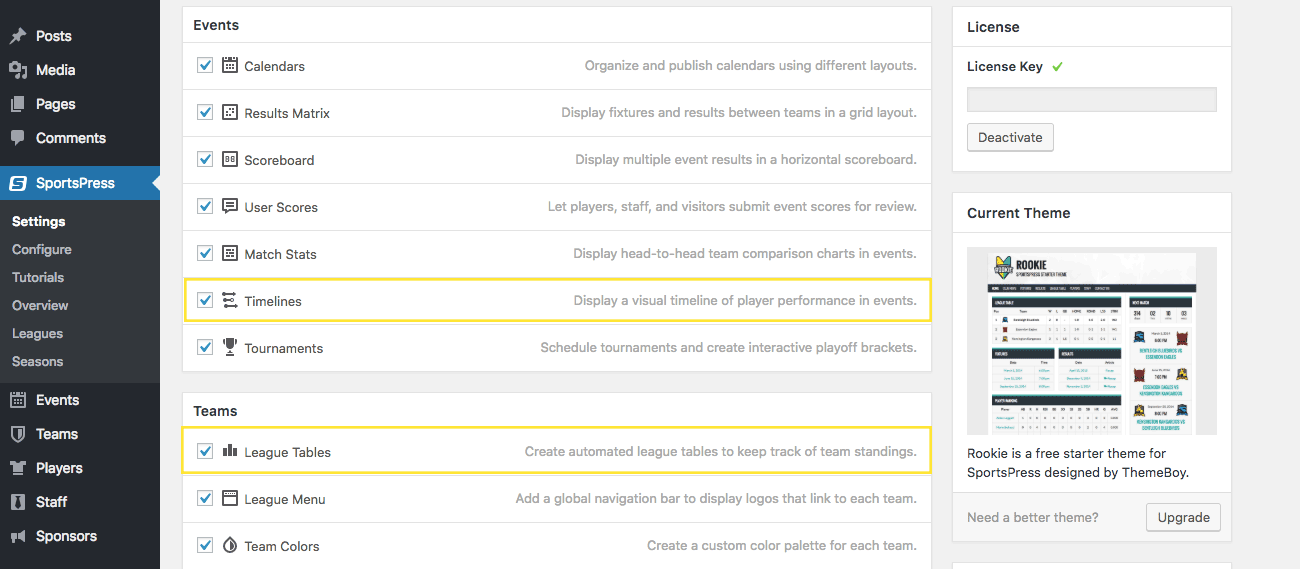
You also need to enable the functionality for the specific modules. Depending on the feature you want to set up, head to SportsPress > Settings and make sure Timelines and League Tables are checked on the Modules page.
Displaying Your Upcoming Rivals
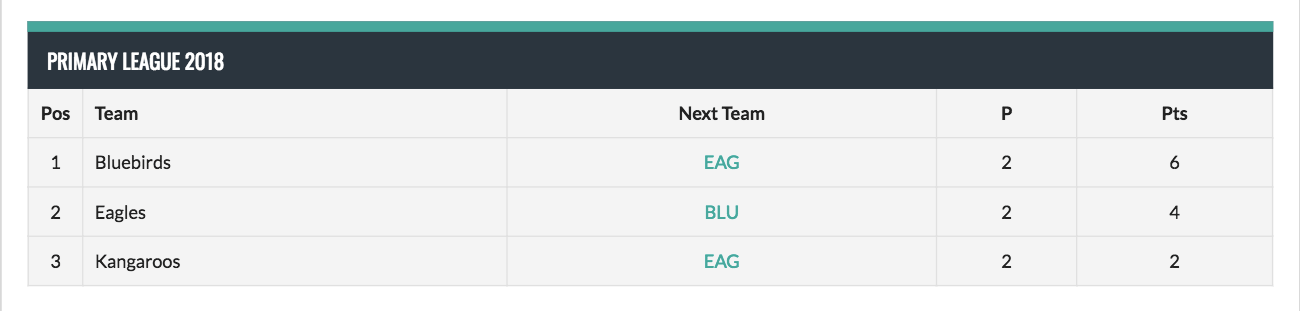
League tables are a great way to get an overview of how multiple teams are doing in one compact grid. By adding the Next Team Column feature to your league tables, you can keep fans up-to-date on the next rivalry they’ll need to gear up for.
If you’re unfamiliar with league tables or haven’t set them up yet, check out How to Create League Tables and Team Profiles in WordPress for an overview before you get started.
Adding Next Team Columns
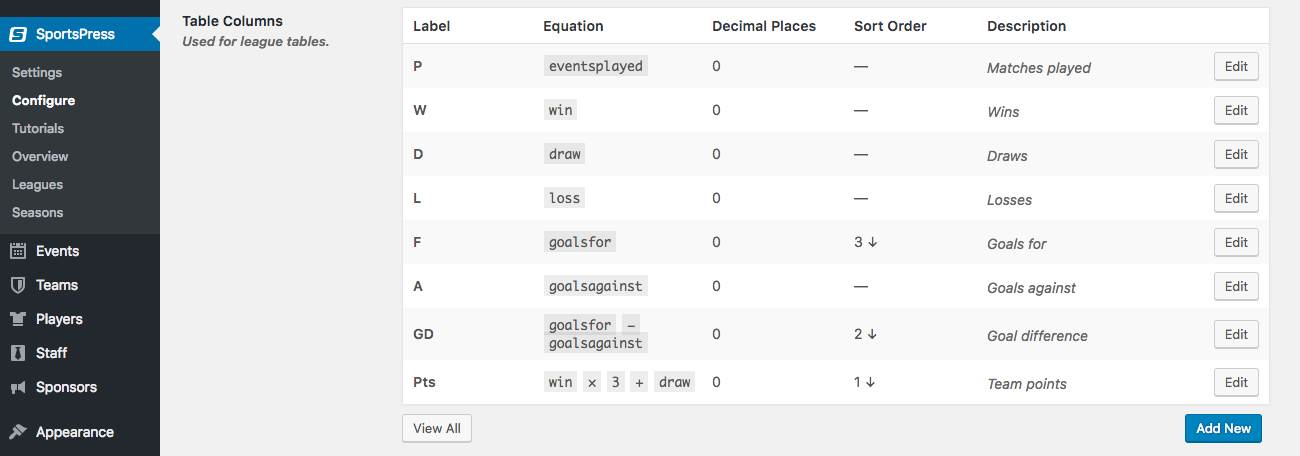
To add the Next Team Column feature to a league table, go to the Configure page that can be found at SportsPress > Configure.
The Configure page contains a variety of variables and equations for score calculations as well as event and player statistics.
Halfway down the page, you should see a Table Columns section that has the description “Used for league tables.” This module houses the variables that feed data into the league tables.
Select Add New below the box and enter “Next Team” or whatever label you prefer into the Enter title here area. The equation at the bottom should change from f(x) to the title you entered.
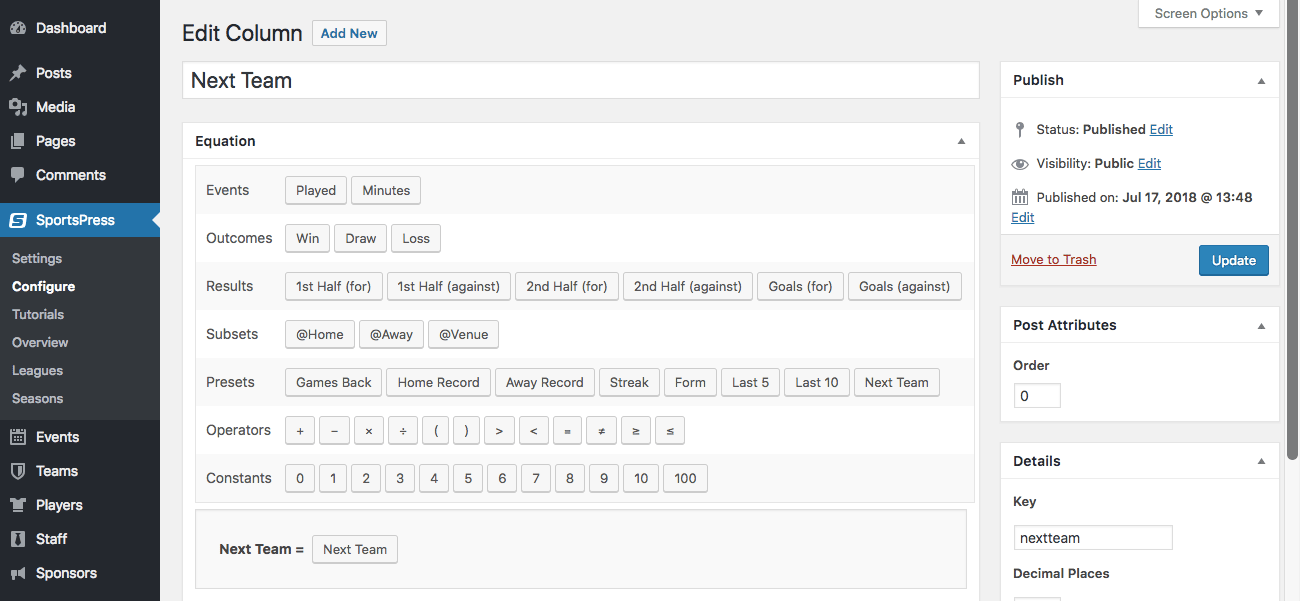
Drag the preset Next Team into the other side of the equation. You can also add a description below for future reference.
Make sure you click Publish to add the column to all your league tables.

Viewing the League Table
To access your League Tables, go to Teams > League Tables.
Click View or Edit after hovering over one of the listed items, depending on whether you want to see the front or the back-end.
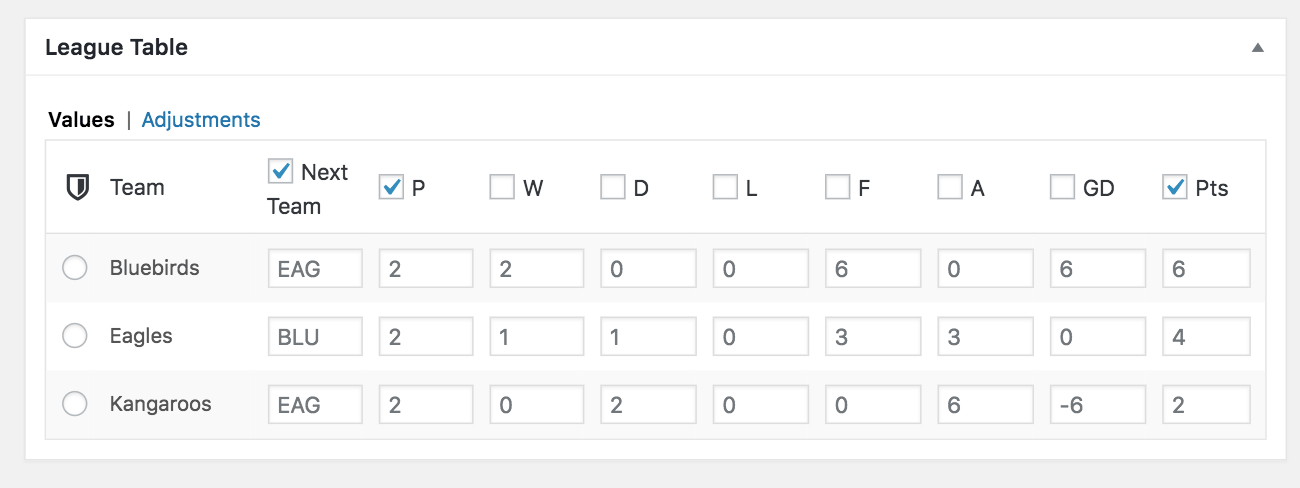
In the admin area, you can decide which league table columns you want displayed. Check or uncheck the corresponding boxes accordingly.
SportsPress will retrieve data from your future events and populate the next head-to-head match automatically.
Click View League Table at the top of the page to see the final result.
The names of the opponents for the next matches link to the page of the future event. The slot will refresh with the next upcoming match after the date of the game has passed.
Displaying Logos
Want to sharpen up your league tables even more? Add a little color and visual content with logos.
You can display the head-to-head matches using a team logo by going to the Teams page. Select any team to edit, and then upload a logo in the sidebar.
Not only will the logo appear in the Next Team Column, but also beside the name of the team listing.

There are so many options for the content of your league table. Now, you can throw some head-to-head matches into the mix.
You can also display your league table anywhere on your site using the shortcode on the Edit League Table page and watch the compliments roll in.
Displaying Vertical Timelines
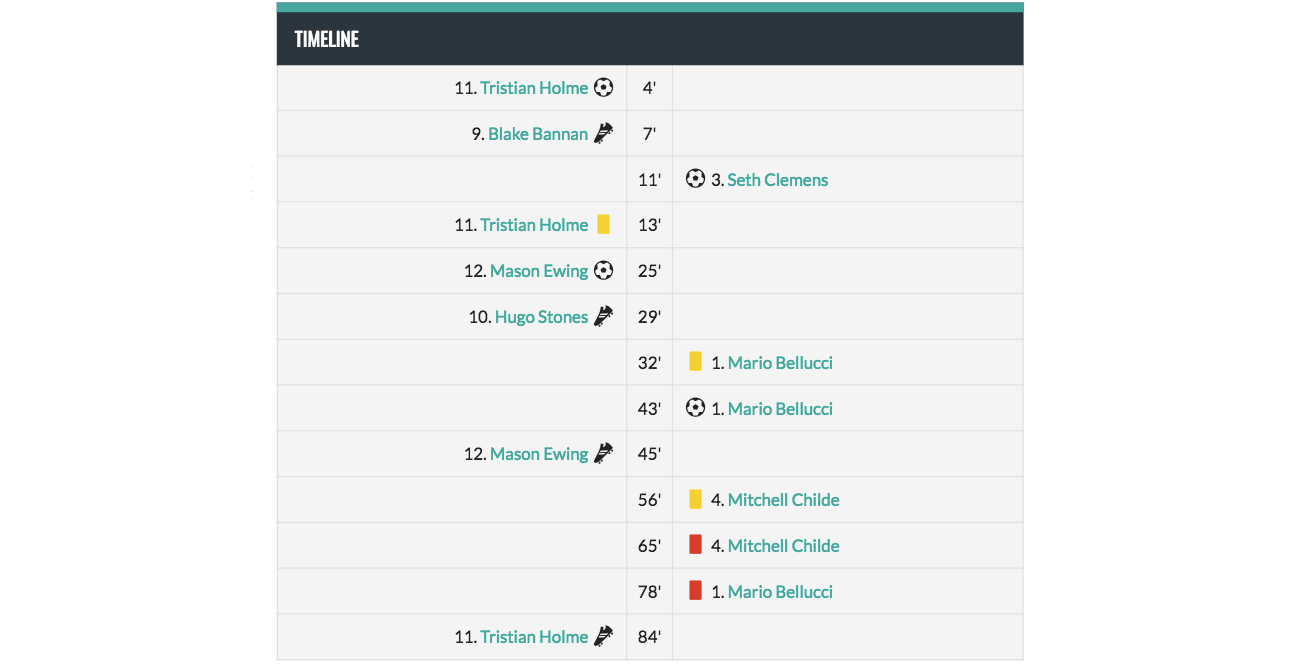
One of the neatest features of SportsPress Pro is the capability to show a play-by-play overview of the game right on your website. The visual timeline on an events page breaks down a match’s events by the minute with sleek custom icons and player attributions.
Since the 2.6 SportsPress Pro update, timelines can be vertical as well as horizontal and can include even more details such as the names of players and links to their profiles.
If you have already added all this data, SportsPress will automatically compile it for you – no need to re-enter it.
Checking it Twice
If you have checked the timeline module as previously mentioned, you’ll also want to make sure you have enabled the module on the Event Settings page.
Drag the box wherever you want to display it on the actual events page. This can take some visual testing to see how you like it.
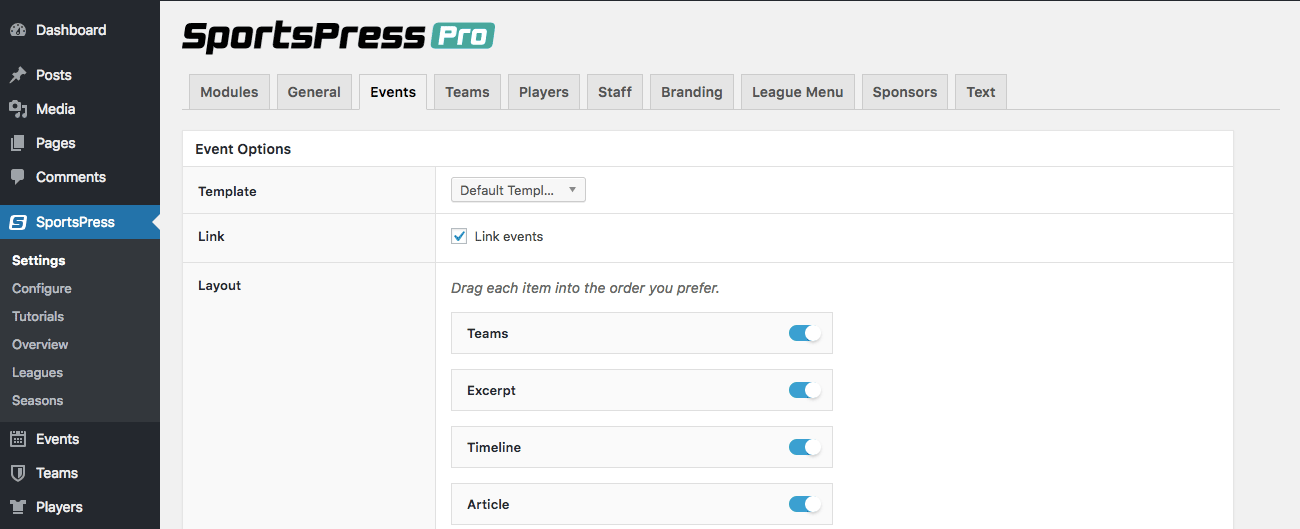
Below the Layout section there’s an option to declare a standard Full Time for each match. While you are also able to edit the Full Time directly on the Edit Event page, you can set the default here.
Full Time marks the length of the match and will determine the full spatial length of the timeline.
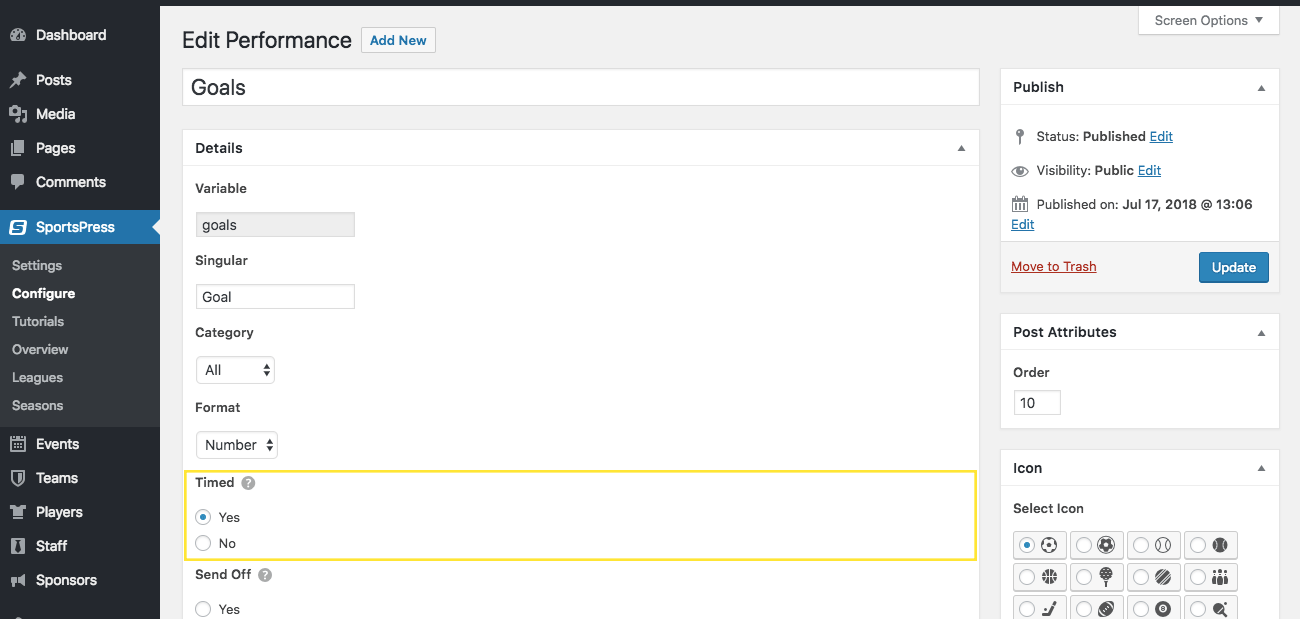
You also need to go to SportsPress > Configure and select Yes under Timed to be measured for each of the player performance variables in the section. This will make a minutes section on the Edit Event page appear so that you can enter a time marking.
Shift the Perspective
If you’re not familiar with the timeline feature that existed previously, below is an example of a horizontal play-by-play timeline that can be displayed on any events page in SportsPress. By giving every notable play in a game a time description, SportsPress can lay out a visual mapping of the game.

To change the orientation of the timeline, go to SportsPress > Settings > Events and scroll down to the Timelines section.
The default selection will be Horizontal. Select Vertical and click Save Changes at the bottom of the page.

To see the new layout, go to Events and select View after hovering over a listed event.
If you would like to change the icons for each of the event markings to make it your own, edit them on the Customize page in each Player Performance Variable. You can choose from a set icon or you can upload your own image.
Icons can also be color-customized to fit the team and the sport.
The vertical play-by-play timeline has player attributions as well as links to their profiles. It’s a great option if you want an eye-catching feature to help make your sports WordPress website visually striking.
It’s also possible to go a step further and include additional customizable details about each match with the Event Specs feature. For example, the number of fans in attendance, details about the venue as well as the weather.
For details, check out SportsPress 2.6 Update with Conditional Equations and Event Specs.
Wrapping It Up
Whether you’re heading into that head-to-head match or ready to break a past one down with a play-by-play timeline, these features can help you display your matches with specificity and gusto. Your fans will surely be pumped for these new SportsPress components.
You can get ‘em revved up and ready to cheer you on for the next match.
Are you more excited to show a head-to-head match or a play-by-play timeline for your team? What other aspects of an event would you like to display on your WordPress website? Let us know over on Twitter or Facebook.
