How to Create League Tables and Team Profiles in WordPress

The main purpose of any sports team website is to provide information. Anyone who comes to the team’s website should be able to find out who is on the team, what they stand for, how they are faring in their particular sport and more.
For that reason, there are a number of standard features that clients often request from their developers. One of the most prominent examples is the ability to create league tables for their WordPress website.
In this article, we want to show you how you can do so quickly and easily with the SportsPress plugin. In addition to that, I will demonstrate how to create team profiles, apply custom team colors to them and add an additional league menu to the top of the page.
Don’t worry if it sounds like a lot, we’ll take it one step at a time
First Things First: Install SportsPress
To take advantage of the features below, you first need to install our free SportsPress plugin. To do so, go to Plugins > Add New and search for “SportsPress”.
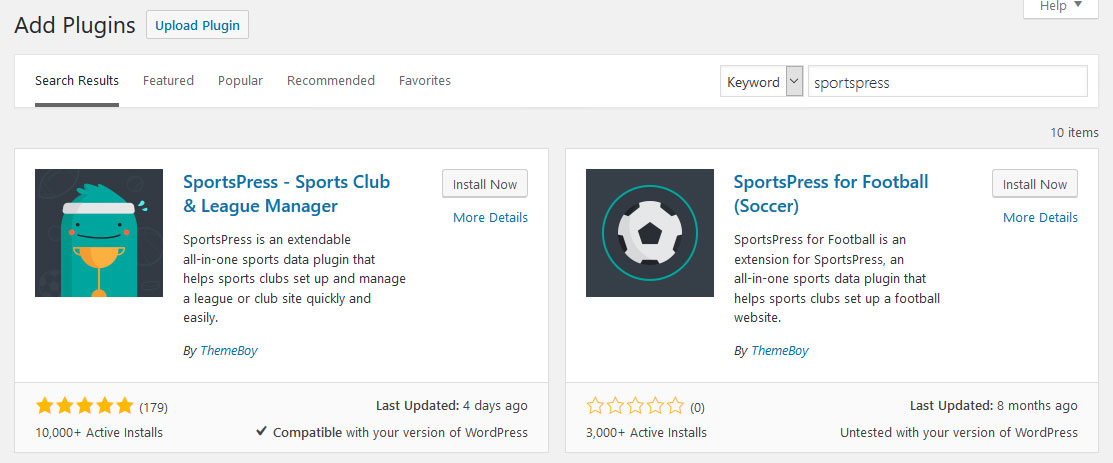
The plugin should appear at the top. Click Install Now and wait for it to download. After that, hit Activate.
How to Create League Tables for Your Sports Website
First, we will talk about league tables. Most fans care deeply about following their team’s ups and downs in the standing and for that reason, adding league tables to a sports website is a must.
In SportsPress, you can create league tables for different leagues and seasons. That way, you automatically create an archive of earlier seasons. Of course, you can also show your league table on the front page of your site. Let’s start from the beginning.
Create a New League Table
Creating a league table with SportsPress is as easy as everything else in WordPress. You find the option under Teams > League Tables.
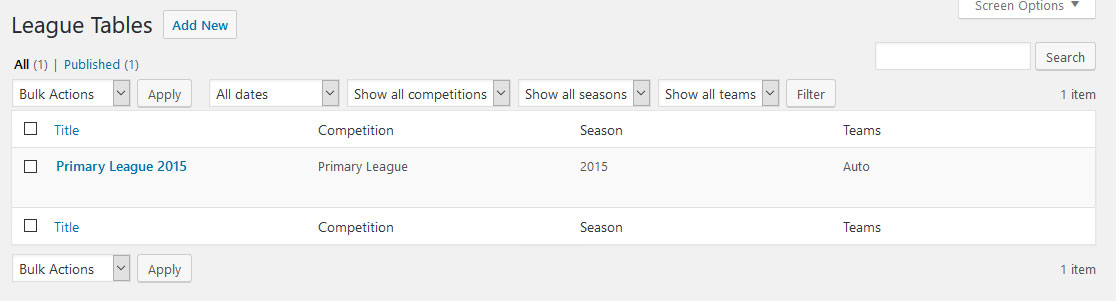
In this screen you will find all your existing league tables. You can also use the big Add New button at the top to create a additional ones. It will take you to the following screen.
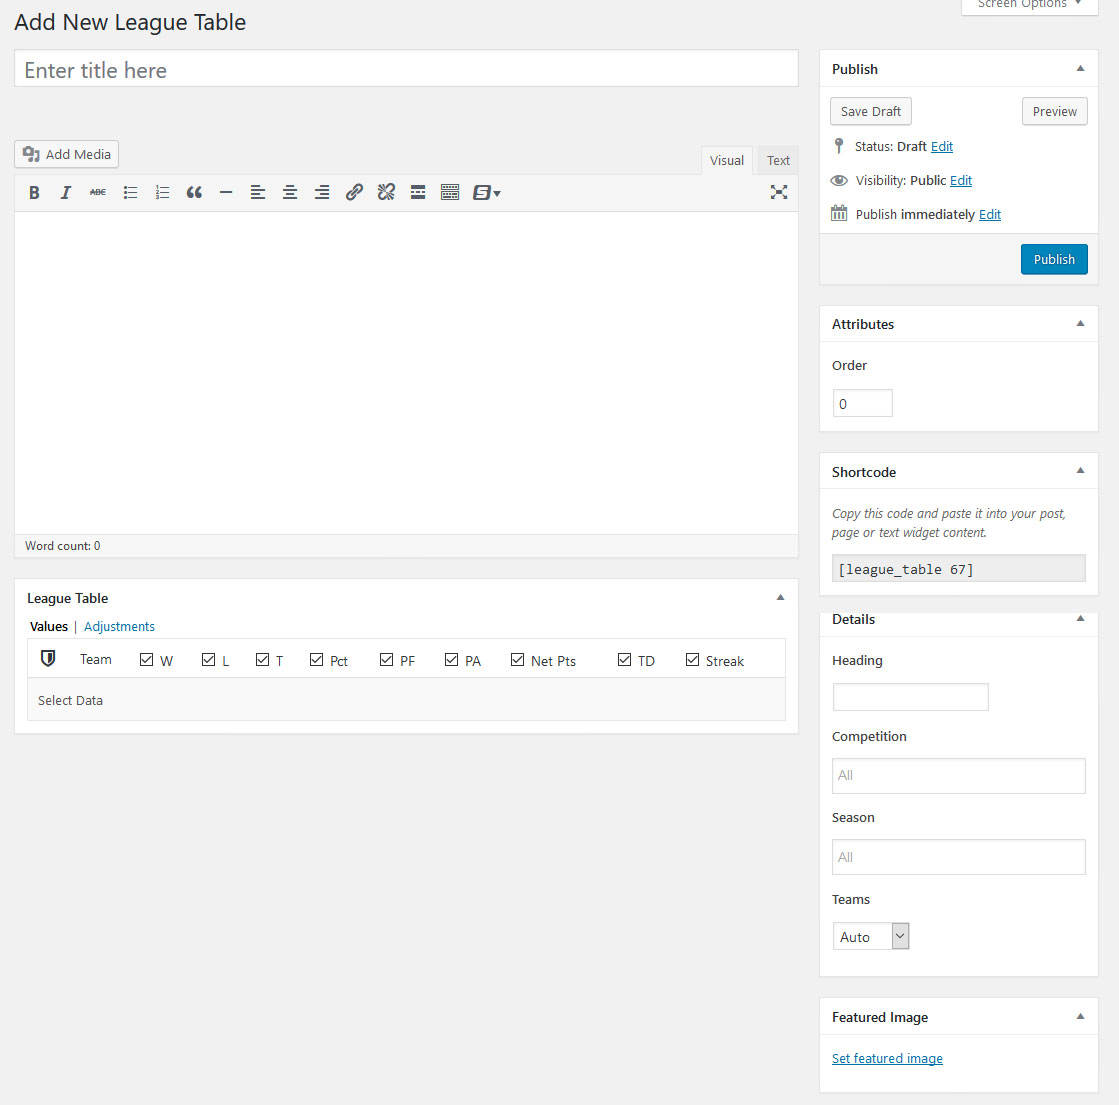
Here, your first task is to give your league table a name in the title box. Doing so will also create a permalink for the table under which it can be found later.
If you want, you can also add an image to your league table by using the Featured Image option at the bottom.
Configure League Table Details
For the league table to display anything, we first need to pick the league/competition and season it is meant for. Only then can the plugin pull the relevant team data to display in the table. You can do all of this in the Details box.
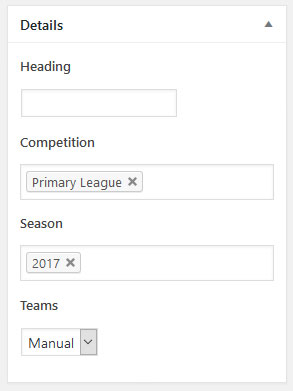
Clicking into Competition and Season lets you pick any of the competitions and seasons you have already set up in the SportsPress menu.
At the top, you may also define a custom heading in case you want the league table’s title to be different than the page title when it gets displayed somewhere.
At the bottom, you are able to choose whether SportsPress should pull teams automatically or whether you will choose them manually.
If you want to pick the teams by hand, you have to choose this option from the drop-down menu and then save your league table first. Only then do you get the option to pick teams manually.
Article continues below…
Once done and after you have saved your league table as a draft, it is then time to configure it.
Set Up the League Table
Once you have hit Save or Publish, you will see that the League Table box at the bottom of the screen is now populated with teams from the competition and season you have chosen.
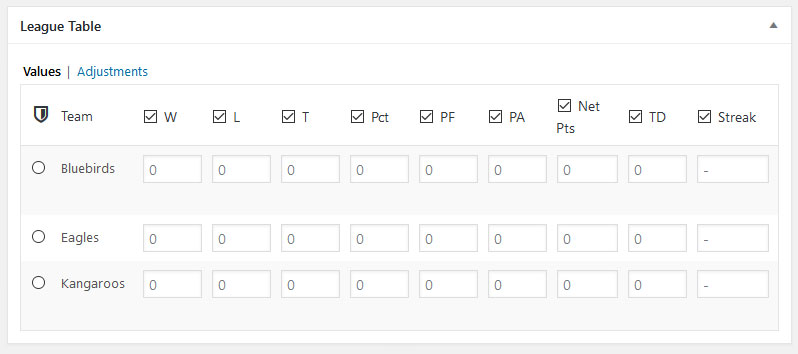
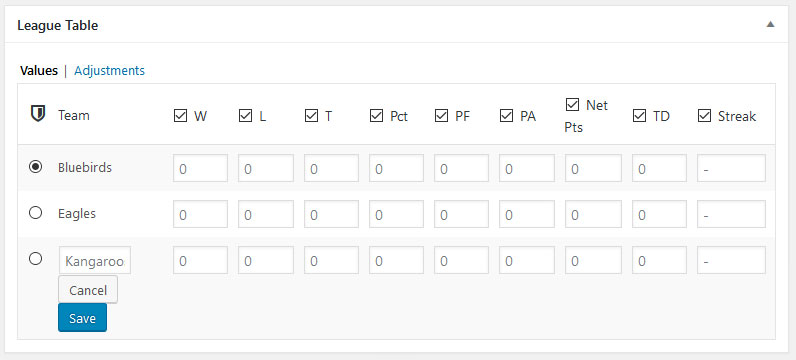
One of the first things you can do now is use the radio button at the left to highlight a team of your choosing. That way, it will always be easy to see where your team is currently placed.
If necessary, you can also change team names in to something else than their pre-configured abbreviations. For that, just click on any of the names, write whatever you want and hit Save.
Via the checkboxes at the top you then have the possibility to configure what data you want the league table to display for each team. Visitors can also use those to order the teams after any particular information they are interested in.
Once you are done with this part, all that’s left is to fill in the fields with relevant data. Hit Publish to make the league table public. Now anyone who wants to see how your team is faring in the current season can visit the page of the league table and get all the information they need.

Well done, congratulations!
Display Your Table on Your Site
In most cases, however, it makes more sense to display the league table in several places and not just on its own dedicated page. Thankfully, SportsPress offers ways to do so.
First of all, you might have noticed the Shortcode metabox in the league table edit screen.

By copying and pasting this piece of code you can easily display your league tables anywhere on your site that you want. Posts, pages, text widgets, you name it.
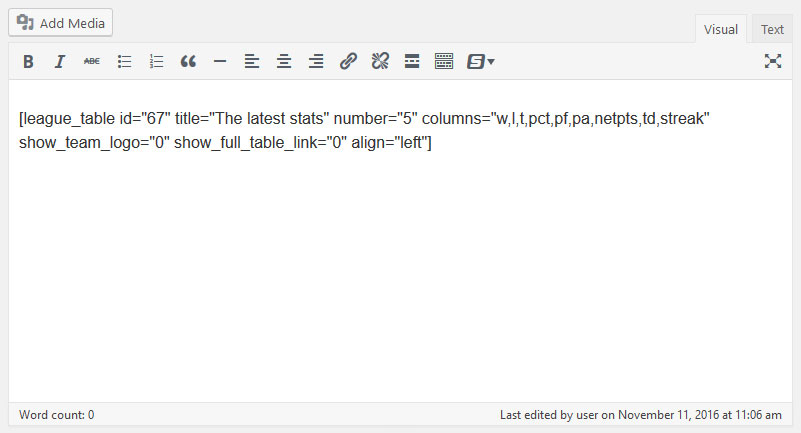
In addition to that, SportsPress also offers more automated options to accomplish this. For example, you might have noticed the SportsPress button at the top of the WordPress editor.
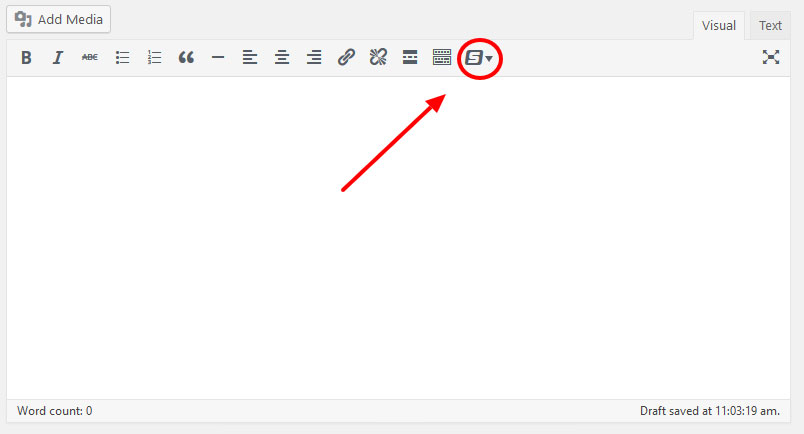
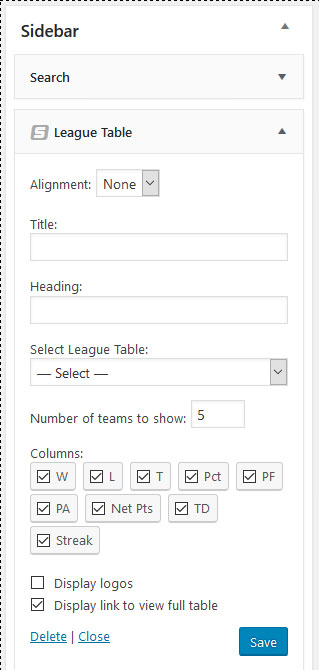
This button enables you to pick any league table you have created and input its shortcode automatically. All you need to do is click it and then choose League Table. This will open the following menu:
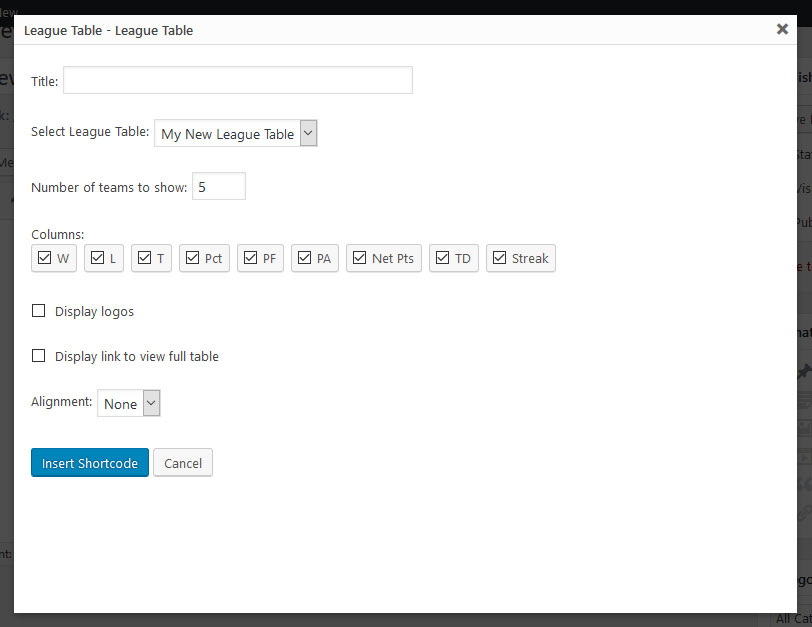
Here, give your league table a title, pick the one you want to display via the drop-down menu and adjust options like the number of teams to display and what columns users should see.
After that, just click Insert Shortcode and the plugin will automatically input the necessary information.
A similar option exists for widgets. Under Appearance > Widgets, you will find a new League Table widget to display your tables in any widgetized area on your site.
Just drag the widget to the area in questions, configure its options to your liking and save when you are done. Easy peasy.
Add a League Menu to the Site
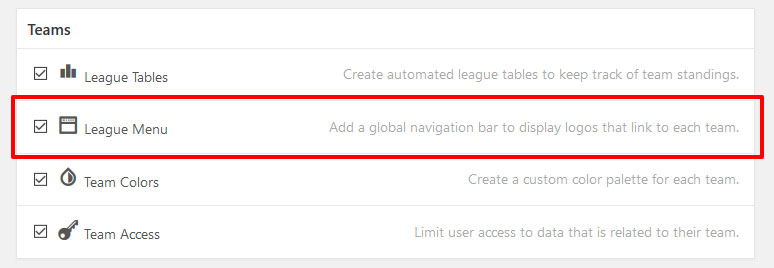
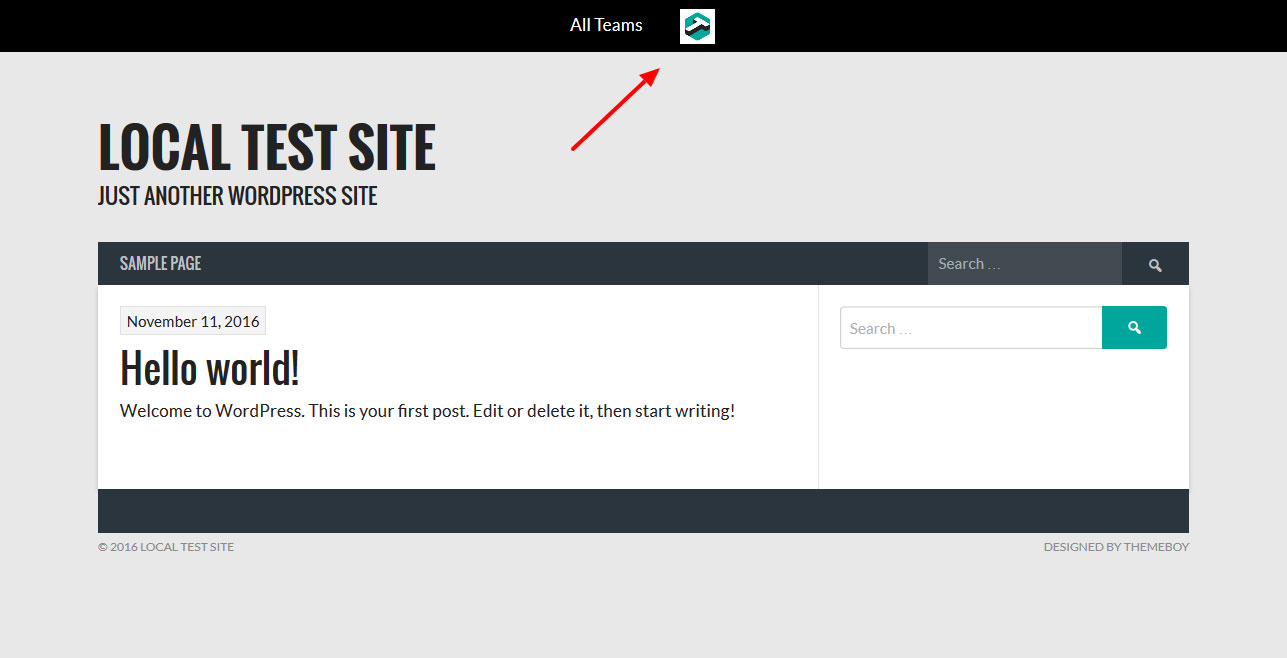
To take league standings even further, you can also use the League Menu, which is a SportsPress Pro feature. It creates an additional menu at the top of your site with the logos of all registered teams.
These will link directly to the team profiles, making them much easier to access. If you leave a team profile empty, you can even have them link directly to the team’s homepage instead.
Activate the League Menu Module
To use a league menu, you first have to activate it. For that, go to SportsPress > Settings, check the box for League Menu and save at the bottom.
Configure the League Menu
Once you have done so, you will get a new League Menu tab in the SportsPress settings. Click it.
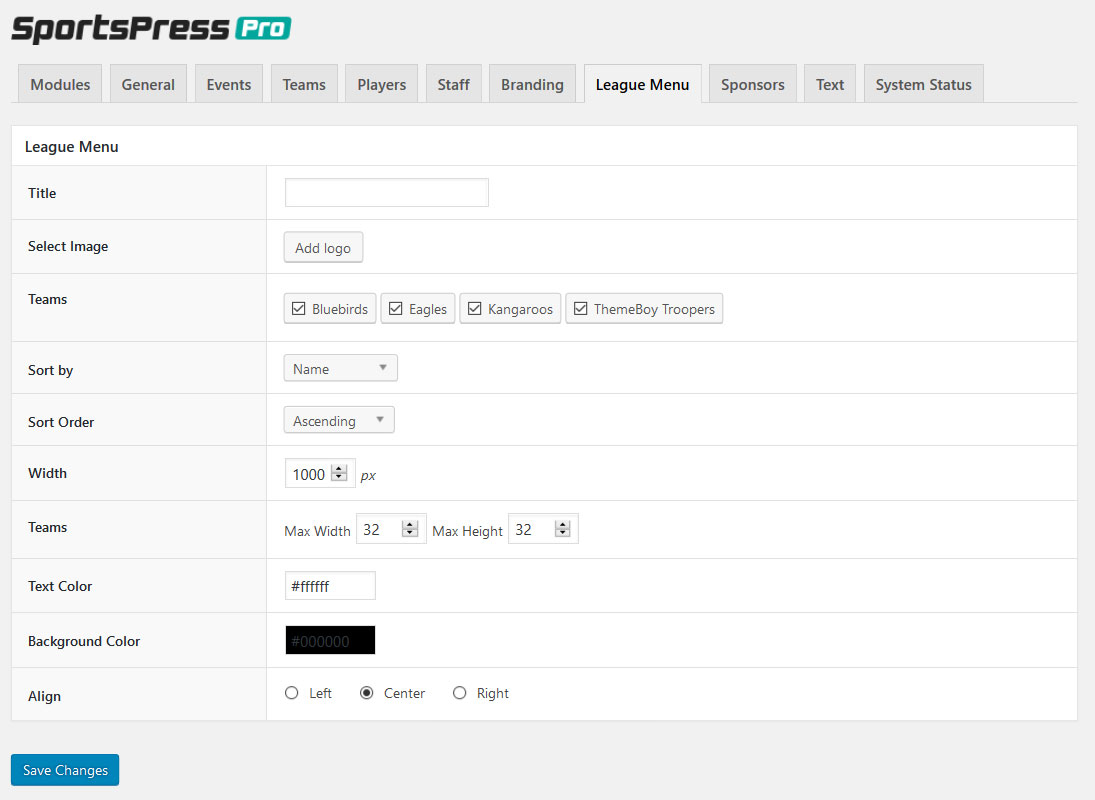
In this menu, you will find all the settings to customize the league menu’s design at the front end of your site:
- Title — The title of the league you are displaying in the menu
- Logo — Here, you can add the league logo and configure its size
- Position — Change the logo position if needed
- Teams — The teams you want to display inside the menu
- Sort by — Sort the teams inside the league by name or [what are the other options?]
- Width — Adjust the pixel width of the league menu
- Teams — Configure the maximum width and height of team logos
- Text Color — Option to change the text color inside the league menu
- Background Color — The color of the menu itself
- Align — Align the team logos either left, center or right
Once you have adjusted everything to your liking, be sure to save the changes. After that, delight in your site’s new league menu!
How to Create Sports Team Profiles in WordPress
A second thing we we want to do is add a team profile. Team profiles contain important basic information about the teams featured on your site, such as:
- Team logo (learn how to create your own sports team logo)
- Images and description
- Players
- Staff
- Current league standing
Through a team profile, anyone who comes to the site can immediately get an overview of all important information about the team. Let’s see how to add it, shall we?
Create a New Team
The first thing we do is find the Teams menu on the left side and click Add New. This will take you to this page:

As you can see from the familiar editor, creating team profiles is just as easy as creating any other type of WordPress content.
Add the Team Name
Now, enter the team name in the title field. This way, it will show at the top of the page when anyone views the profile.

Once you have done so, WordPress will automatically create a permalink for the team page. Should you want to change something about it, you can do so by clicking Edit.
Set up the Team Logo
Next up, we want to add a team logo. You find the option to do so in the lower right corner under Logo. Click Select Logo to get started. In the following screen, you can either upload a logo image or select one already on your site.
For best results, use a PNG-24 image with a transparent background that is at least 300 pixels wide.
Once you have uploaded or selected the image, click Select Logo in the lower right part of the screen. That’s it, your team logo is now set.
Add Team Description and Images
In the area for the main content, you can add some text about the team and also display images if you want.

Have a look at sports team branding and how to create team photos if you need ideas for what to put there.
Of course, all content in this box can be formatted with the usual WordPress options and you can also add one of the many SportsPress shortcodes if it makes sense via aforementioned the SportsPress button.
Configure Team Details
Under the Details panel, we also have an option to provide additional information about the team.
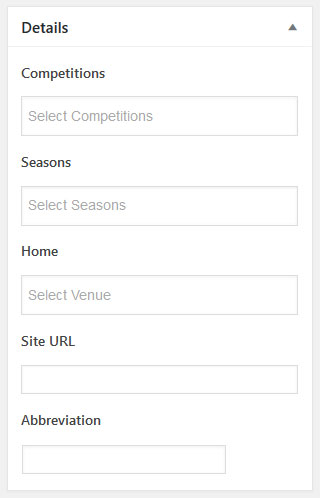
Here’s what each option means:
- Competitions — The competitions the team is taking part in (you need to set them up under SportsPress > Competitions).
- Seasons — Seasons the team has been active in (choose from the seasons configured in SportsPress > Seasons).
- Home Venue — The venue this team proudly calls its home (pick from the venues set up under Events > Venues).
- Site URL — The link of the team website, not the team profile.
- Abbreviation — For where team names are not displayed completely.
Add Staff, League Tables and Player Lists
As a final step, you can add staff members, league tables and lists of the team’s players to the profile. This is done in the respective boxes under the main editor panel.

Be aware, however, that for you to have any options here, you first need to have them configured it first.
We already talked about how to create league tables in detail above. Players and player lists are set up in the Players menu. Staff members and their jobs under the Staff menu item.
Ready? Then it’s time to hit Publish to make the profile appear on your website.
Edit Team Profile Template
After you have done so, you can have a first look at it.
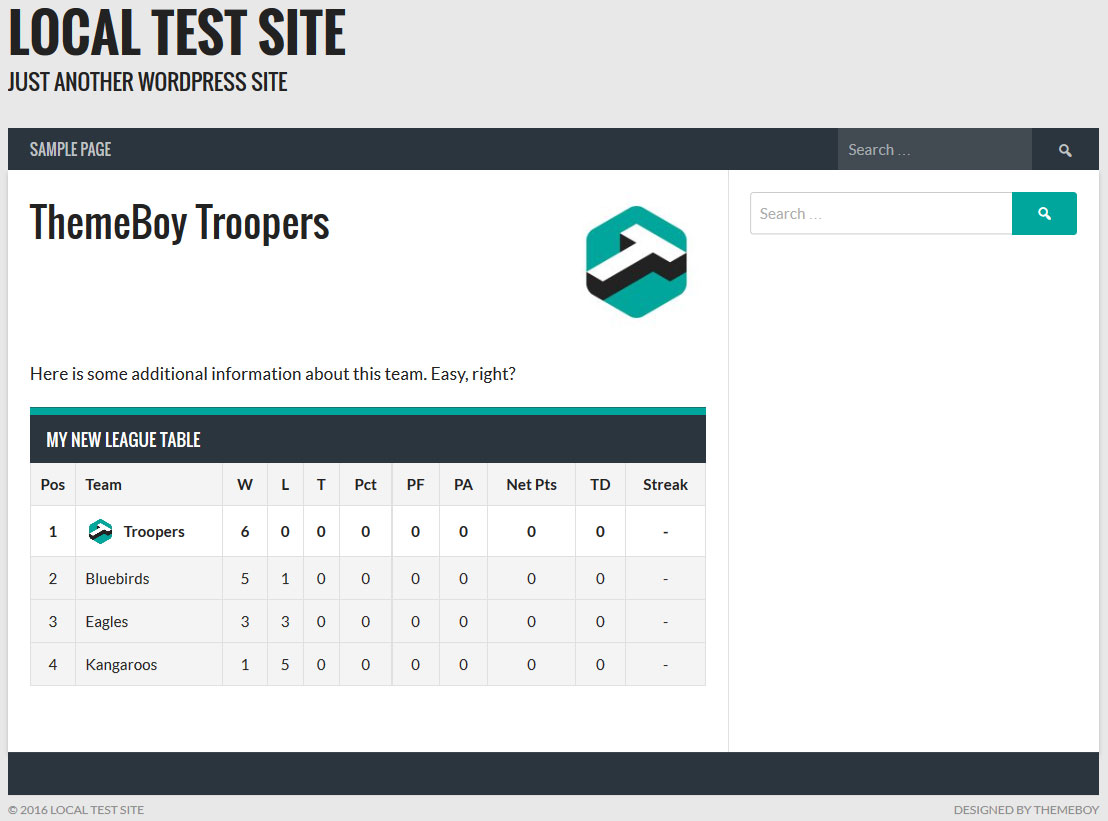
Looks good, doesn’t it? However, in case you are not quite satisfied with the layout yet, you will be delighted to hear that you can completely control what it looks like under SportsPress > Settings > Teams.
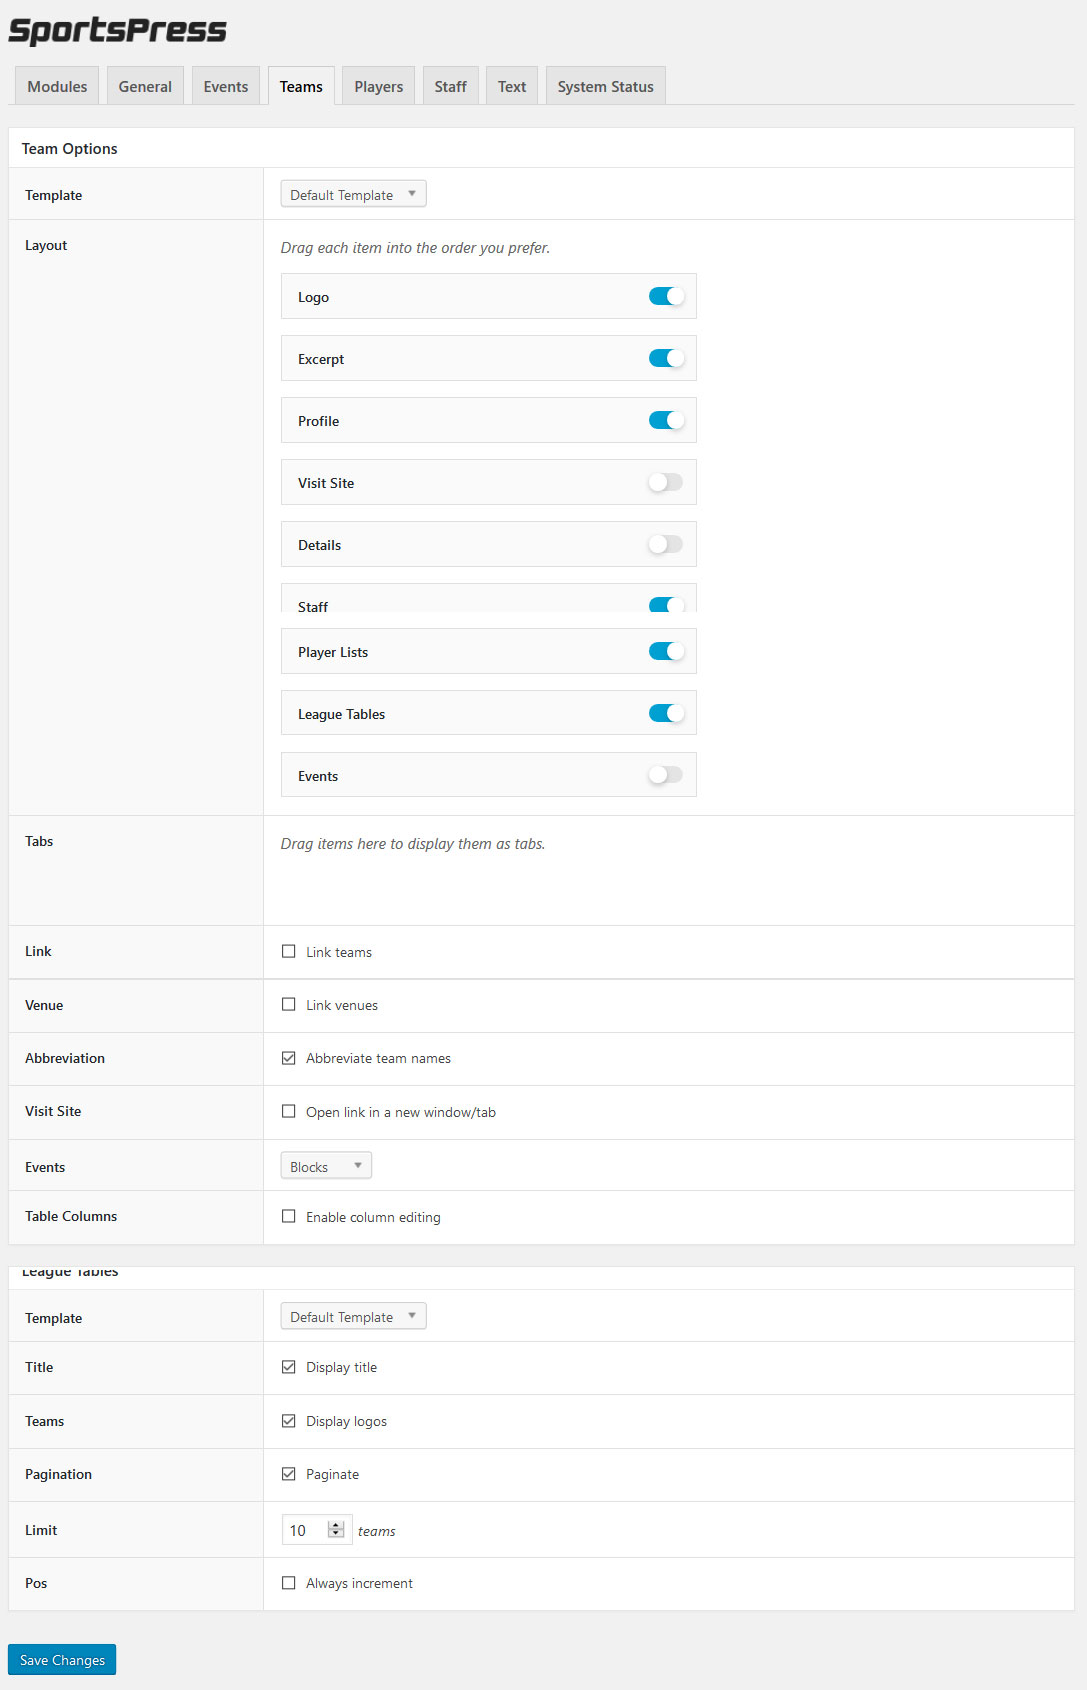
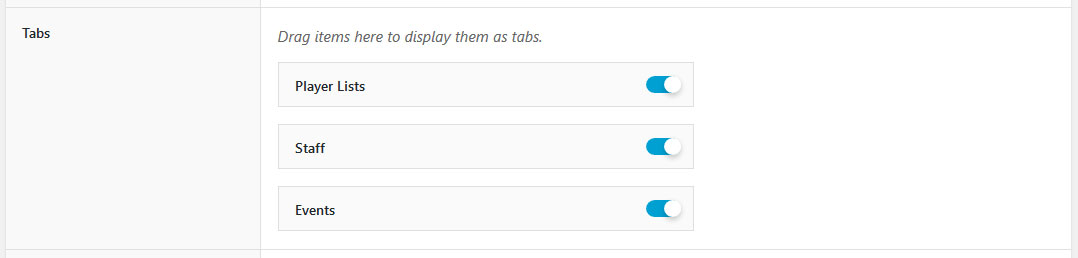
At the very top, you find an option to pick existing page templates that come with some themes. Below that, you can manually enable and disable parts of the profile with the click of a button. In addition to that, this part allows you to rearrange their order via easy drag and drop.
If you want, you can also drag some or all of them down into the Tabs area to display them in tabbed form on the front end.
In addition to that, you have the following options:
- Link — If disabled, team logos and names will not link back to their respective team pages
- Venue — By enabling this option, the venue name on event pages will contain a link to the venue itself
- Abbreviation — The abbreviated names under which teams will appear in many places of the site such as league tables
- Visit Site — Whether or not to open team website links in a new window or tab when clicked
- Events — Display events as blocks or in form of a calendar
Aside from that, also have the following options for the display of league tables in team profiles:
- Template — Use a preset template that you can set up
- Title — Display league title or not
- Teams — Configures whether or not to show the logos of the teams inside your table
- Pagination — Enables you to break up league tables into several pages or show them as one piece
- Limit — Limit the number of teams to show in the table at any time
- Pos – Determines whether or not teams can share a place in the standings when all their standings are equal
Once you have configured everything to your needs, don’t forget to hit Save Changes.
Congratulations, you have just created and configured your first team profile! Not so hard, was it? However, you can take it even further.
Configure Individual Team colors
In another one of our articles, we have talked about the importance of congruent sports team branding. Branding influences everything from the team logo to social accounts like Twitter or a team Facebook page.
On the team website, one of the most important branding elements are the colors. When building a website for a sports team, adjusting the color scheme to its team colors is an absolute must-do.
Thankfully, in the Pro version, SportsPress makes this really easy.
Activate the Team Colors Module
To use team colors, you first have to activate its module under SportsPress > Settings > Team Colors.
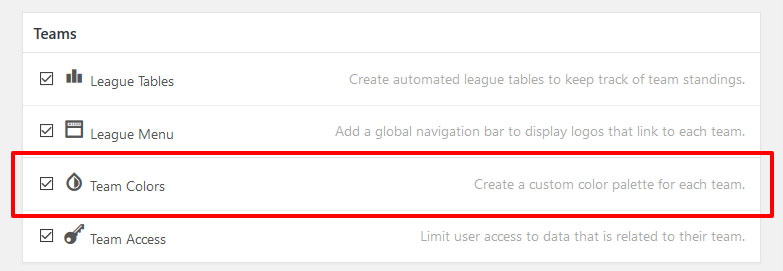
Check the box, scroll to the bottom and hit Save Changes.
Adjust Team Colors
Once you have done so, and return to the team profiles editor, you will quickly notice the new Team Colors box.

It enables you to configure custom colors for each of the team profiles on your site, in particular:
- Primary — Appears in the page heading, league tables and other prominent places
- Background — Determines the background color of your team profile
- Text — The color of everything text-based
- Heading — Heading and subheading color of the team profile
- Link — Change the link color here
To change a color, all you need to do is click into the current one. This will open a color picker from which you can configure a new one.
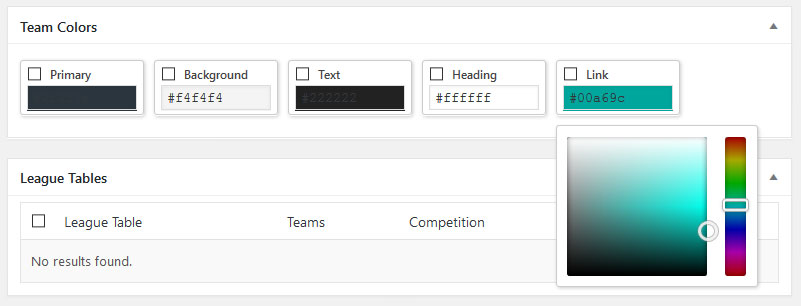
Alternatively, if you have the exact hex codes of the team colors, you can also input those.
What’s important, however, is that you check the boxes for those colors you want to overwrite on the team profile. Only then will the new colors actually be applied when you update the profile.
Pretty neat, right? What’s even better is that team colors will also be appear in player profiles, events, calendars, player lists and staff profiles. That way, the branding stays coherent throughout the entire site.
In Short…
Sports websites have certain essential features that users, fans and web design clients expect. League tables and team profiles are surely on top of that list.
In the tutorial above, we have shown you how to adds these features quickly and easily via SportsPress without the need for any custom coding. This will save you heaps of time no matter if you are building a sports website for yourself or for someone else.
To really make your league standings and team profiles pop, SportsPress Pro additionally offers custom team colors and a dedicated league menu. Highly recommended to further wow both users and clients. Plus, there is more where those came from.
Have you checked our SportsPress plugin yet? It makes building sports websites for many different disciplines really easy and is completely free! Plus, with SportsPress Pro you get plenty of additional features to take it to the next level.
