3 Ways to Sell Your Team Merchandise Online

Selling your team merchandise is a great way to boost your revenue and build your brand. Luckily, there is no need to open up a physical shop and worry about carrying inventory.
Nowadays, you can easily start an online store and sell your team’s jerseys, scarves, coffee mugs, calendars, and more.
Whether you want to focus on selling only physical or digital items or if you want to sell both, there are several ways to get your products in front of your team’s fans and earn extra money for your team.
Three Easy Ways to Sell Your Team Merchandise Online
In this post, we’ll share three easy ways that you can do to start selling your team’s merchandise online.
1. Selling on Your Website
Selling on your own website is the first and most obvious choice. Thanks to SportsPress and WooCommerce integration, you can easily set up your store. We’ve covered how to set up your online store with WooCommerce so you can use that post to guide you in the setup process.
The biggest benefit of selling on your website is that you are in complete control over your store’s design which means you can keep everything on brand and cohesive with the rest of your website.
2. Sell Your Products on Facebook
Another way to sell your products online is by connecting your WooCommerce store with your Facebook page. Let’s go through the process of setting up your store on Facebook.
Step 1: Install and activate Facebook for WooCommerce plugin
Go to WooCommerce.com and download Facebook for WooCommerce. Then, log in to your WordPress dashboard and head to Plugins > Add new. Click on Upload plugin and select the zip file that you downloaded from WooCommerce website. Click install and then activate the plugin.

Step 2: Connect your store with your team’s Facebook page
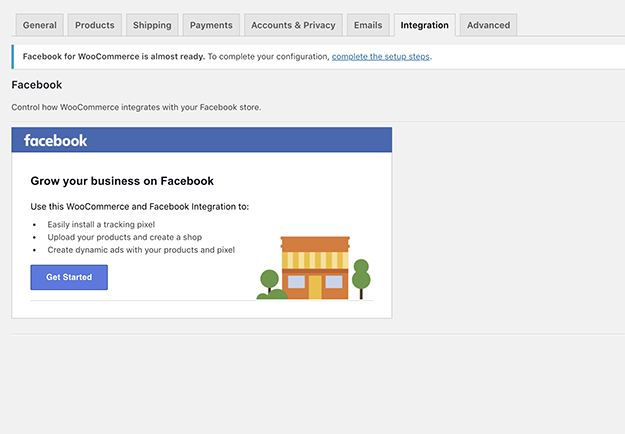
Once the plugin has been installed, you’ll see a notice in your dashboard area asking you to complete the setup process for the plugin. Click the link and then press the Start button as shown in the screenshot below.
You’ll then be able to connect your team’s Facebook page. Select the appropriate page from the drop-down menu and hit the Next button. You will then be able to sync your products with your Facebook store by clicking the Next button.

Step 3: See your products on your Facebook page
When you have finished setting up Facebook for WooCommerce plugin, you can see how your products look on your Facebook page. To do that, go to your Facebook page and then click the Shop section in the sidebar menu.
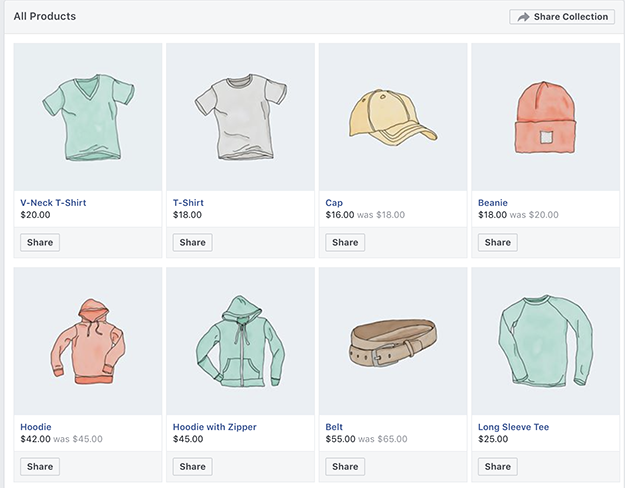
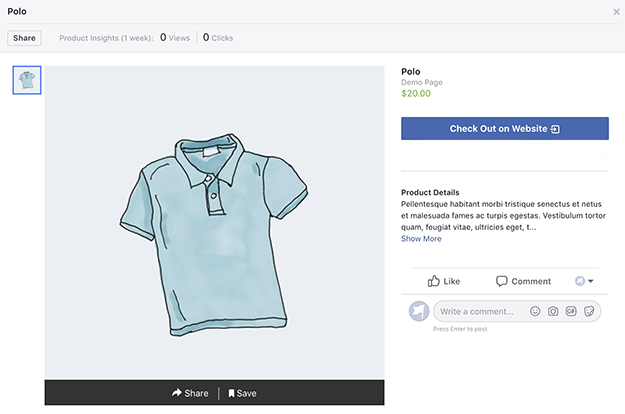
Your fans will also be able to access your shop. Clicking the individual product allows them to see a larger product image and product details. Once they click the button to see the product on your site, the product will instantly be in their cart and they can complete their purchase.
3. Selling on Instagram
Lastly, you can also sell your products on Instagram. As we’ve mentioned before, sports brands are popular on Instagram so why not reap the benefits and go where your fans already are?
The best part about selling products on Instagram is that it’s easier to set up once you’ve connected your store with your Facebook page. Here’s how to do it:
Before you start setting up your store on Instagram, you’ll need to convert your existing Instagram account into an Instagram Business Account by following these steps. If you’ve already done so, then you can proceed with the setup.
Step 1: Connect your Facebook Page Catalog with your Instagram account
Start by logging into your Instagram app on your phone. Go to your profile and press the Edit profile button. Under Business information, choose the page that has your store catalog which was automatically created when you imported the products during the Facebook setup process.
Step 2: Request approval for the Shopping feature
Once your Facebook catalog and your Instagram account have been connected, you need to request approval for the Shopping feature and wait for the approval. The approval process usually takes a few hours or a few days. You will receive a notification in your Instagram app when your catalog has been approved.
Step 3: Start tagging products
Using the Instagram app, you can now select photos of your products, add captions and any filter or hashtag, as you normally would. Tag the products you want by entering their name in the Search box, and then share the post to your feed.
Three Reasons Why You Should Sell Your Merchandise on Facebook and Instagram
You might be wondering why you should sell your products on Facebook and Instagram. After all, isn’t the whole reason behind your website is to drive your fans to it so they can get to know your team better? While that is certainly true, there are a few good reasons why selling your team’s merchandise on Facebook and Instagram is beneficial.
Reach More People
Given that both Facebook and Instagram boast millions of users, the first reason for expanding your store to those platforms is the fact that you can reach more people. Not only will your existing fans be able to see your merchandise, but they can also easily share it with their friends or repost it in their feed.
Additionally, any sports fan looking for sports merchandise and memorabilia can potentially come across your products and decide to buy them.
Sell More Organically
By connecting your existing WooCommerce store with Facebook and Instagram, all your products will show up on those networks. This gives you the chance to sell without appearing overly-promotional and without disrupting the usual flow of your social feed.
Provide a Seamless Buying Experience
Finally, by allowing your fans and followers to browse your products on Facebook or Instagram, you provide them with a seamless buying experience. For starters, you don’t have to worry about adding links to your website or individual products. Second, your fans and followers can click the products to see more details and then finish the purchase on your site.
Final Words
Selling your products online is not as difficult as it looks. With tools like SportsPress and WooCommerce, you can easily put your merchandise in front of your fans and discover new potential fans and customers.
Use our tutorial to set up your store for selling on social media and don’t forget to download our checklist of all the steps involved in the process.
