Displaying Advanced Sports Event Specs and Auto Scores

Races are won by milliseconds, games are tied until the very end and victories often come down to the nitty-gritty. SportsPress‘ conditional equations and advanced event specs can automatically calculate them all.
In this post, I’ll share how you can use the SportsPress conditional logic and advanced event specs features to automagically calculate custom, and complex scores and stats as well as how to display them on your sports WordPress website.
SportsPress: The Solution
SportsPress is WordPress’ top athletic management plugin designed to help sports teams and leagues set up a comprehensive athletic website with automated stats, stunning profiles and event modules, and even event management.
To raise the bar even further, SportsPress Pro is the premium version of the plugin with features like tournament modules, animated event countdowns and sponsorship functionality.
To learn more about the distinction between the two, check out Does Your Sports WordPress Website Really Need SportsPress Pro?
Starting Off on the Right Foot
Both of these new features require a certain amount of setup and data already in place so you’ll want to get your sports website put together or at least get some demo data to play around with the features, and do some testing.
To put in some demo data, head to SportsPress > Settings and select the General tab. Choose your sport from the drop down box and select the Install Demo Content checkbox.

With sport-specific demo content installed, you can play around with the functionalities and make sure everything looks and works the way you want it to before taking the time to input all of your own content.
Specifically, this will help with conditional equations because much of the scoring for the sport is already integrated into the theme.
Getting Specific with Event Specs
SportsPress already has a series of preset details about an event such as the date and the time, and a lot more. With the Event Specs module, you can customize the information that’s specific to your event such as attendance, parking information or venue weather.
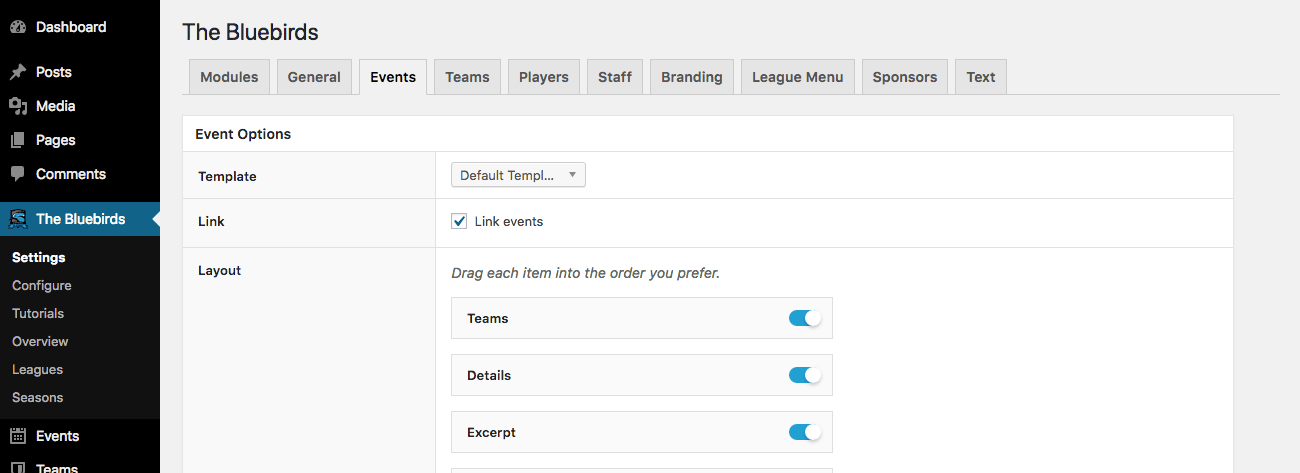
Before you get started, make sure that the functionality of the Details module is enabled. It’s where the Event Specs are displayed.
Go to SportsPress > Settings > Events and toggle the Details switch on to make sure it appears on the screen.
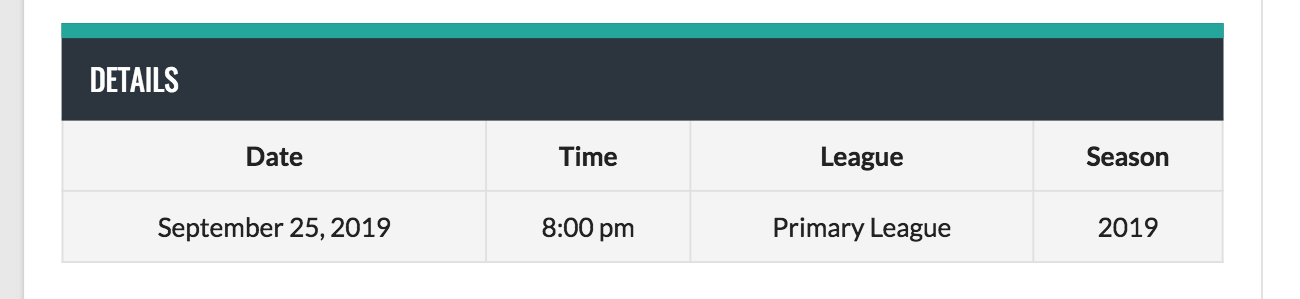
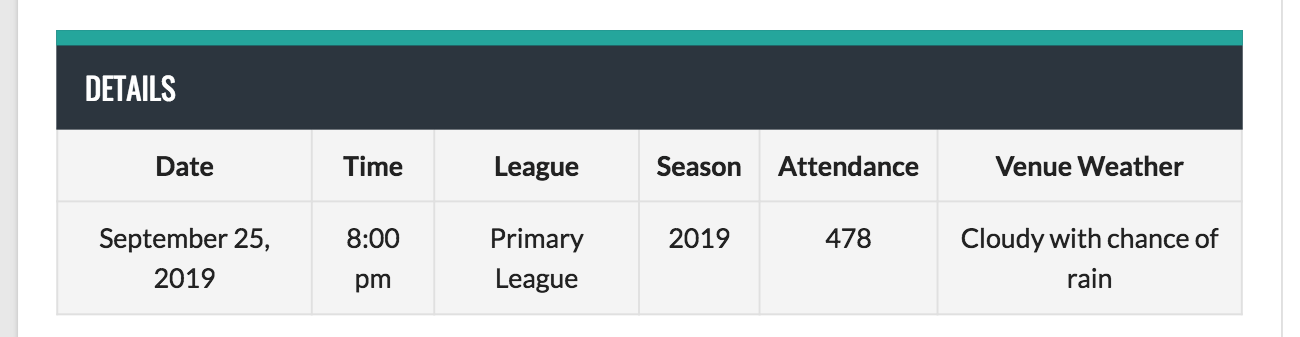
On the front-end, here’s what the details module looks like without any custom event specs.
It’s located on the Events page. You can change the format of the date and time in SportsPress > Settings > Events tab > Details.
Creating Event Specs
To declare a new Event Spec, go to SportsPress > Configure > Event Specs.
It should be at the bottom of the Configure page.

Click Add New below the Event page to declare a new spec.
Once you add a title or label that will be displayed at the top of the column in the Details module on the Add New Event Spec page, the Variable field will automatically be filled in with an all lowercase version.
So, there’s no need to worry about filling out the Variable field as it will immediately populate after entering the title.
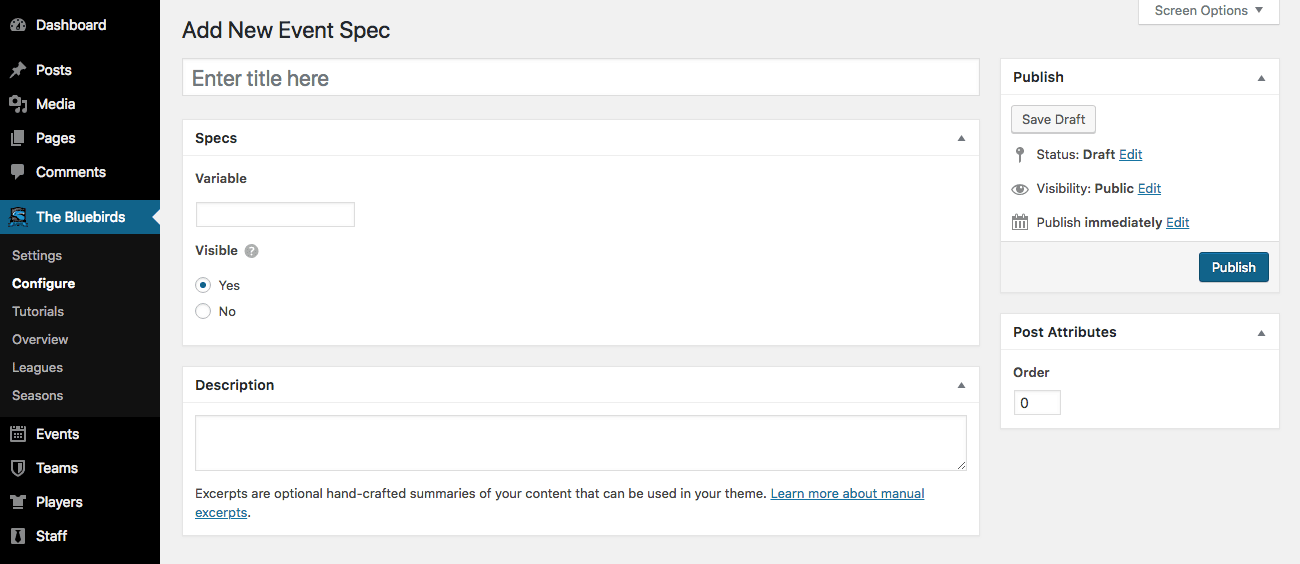
The Description is an explanation of the Variable that will appear on the Event Specs list and that can be useful if the person editing your site is not the person setting it up.
That way, there’s a little extra communication and clarity among those administering your site.
It’s also only displayed in the dashboard.
Additionally, you can select whether to make a spec visible on the actual front end of the event page by selecting either the Yes or No bubble. This will remove the spec from all events.
Editing Event Specs
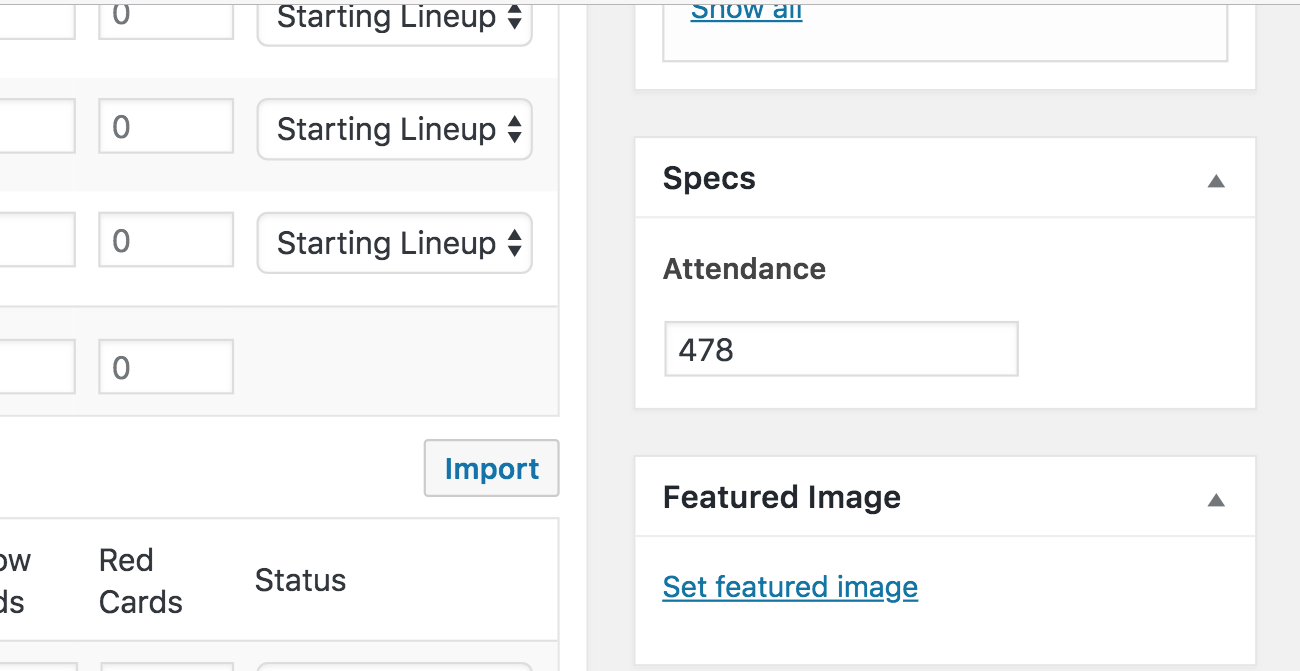
When you are on a specific Edit Event page and you want to input information about your new specs, you’ll find the module in the sidebar of the Edit Event Page.
All specs you have created will appear here. If you want to omit one from a particular event, just leave the field blank.
Be sure you click the Update button, then go to the front end of the Event page to see what the new integrated Events Specs look like in the Details module.
Use the Event Specs feature to its full potential by inserting whatever details your fans need to know or remember about the game.
For example, you can add the number of people in attendance, what the weather was like, details about the venue and anything else you want to include.
Getting Started with Conditional Equations
SportsPress’ 2.6 update brought a whole new world of equations and scoring with the introduction of conditional operators. It’s possible to create various equations in the back end of SportsPress to create new systems of automatic scoring and data calculation.
Custom Equations can be found at SportsPress > Configure.
If you’re not familiar with the entire equations interface and the Configure page, check out Creating an Automatic and Custom Scoring System for Any Sport.
Bring It On
By using conditional operations in SportsPress, you’re able to take simple equations and make them more complex by adding an if/then clause.
Here are the new conditional operators available for equation integration on SportsPress version 2.6:
- > – Greater Than
- < – Less than
- ≡ – The Identity sign, or “Is equal to”
- ≠ – Does not equal
- ≥ – Greater than or equal to
- ≤ – Less than or equal to
To understand their potential, here are a few conditional equations put into a sentence format:
IF a team scores more than 50 points, THEN 3 bonus points are awarded.
or
IF a team has two tournament wins, THEN they advance to semi-finals.
Mathematically, the equations translate as follows:
Bonus Points = (Points ≥ 50) x 3
and
Semi-Finalist = (Wins ≥ 2)
Breaking It Way Down
Let’s take a look at how conditional equations function at the base level. The simplest form of the equation is: ( [variable] [operator] [constant] ).
Here are a couple examples of how to put this formula into action:
(Points ≥ 50)
or
(Wins ≥ 2)
The conditional equation exists inside a set of parentheses, which tells the Custom Equations module to evaluate it as a boolean.
A boolean is a data type with two possible values: true or false. Mathematically, that translates to 1 or 0, respectively.
So, if(Points ≥ 50) is true, the whole equation will evaluate as 1 and that will integrate into the larger phrase such as illustrated below:
Bonus Points = 1 x 3
If it is false, the equation will evaluate as 0. The result will add it in as nothing or it will multiply into the equation and render the result to be 0 such as in the below example:
Bonus Points = 0 x 3
Please note: As mentioned above, you can alter the final variable value by multiplying a number against the condition. If you wanted 5 bonus points instead of 3, change the outer portion of the equation.
Putting It Together
When adding a new conditional equation, just like with Event Specs, go to Sportspress > Configure.
In this example, I’ll create a new Table Column equation, but there are other options as well.
Select Add New at the bottom of the Table Column section and the Equations module screen will appear.
Here’s where you can actually create the conditional equation.
Once you fill in the title of the statistic, the equation will match the input.
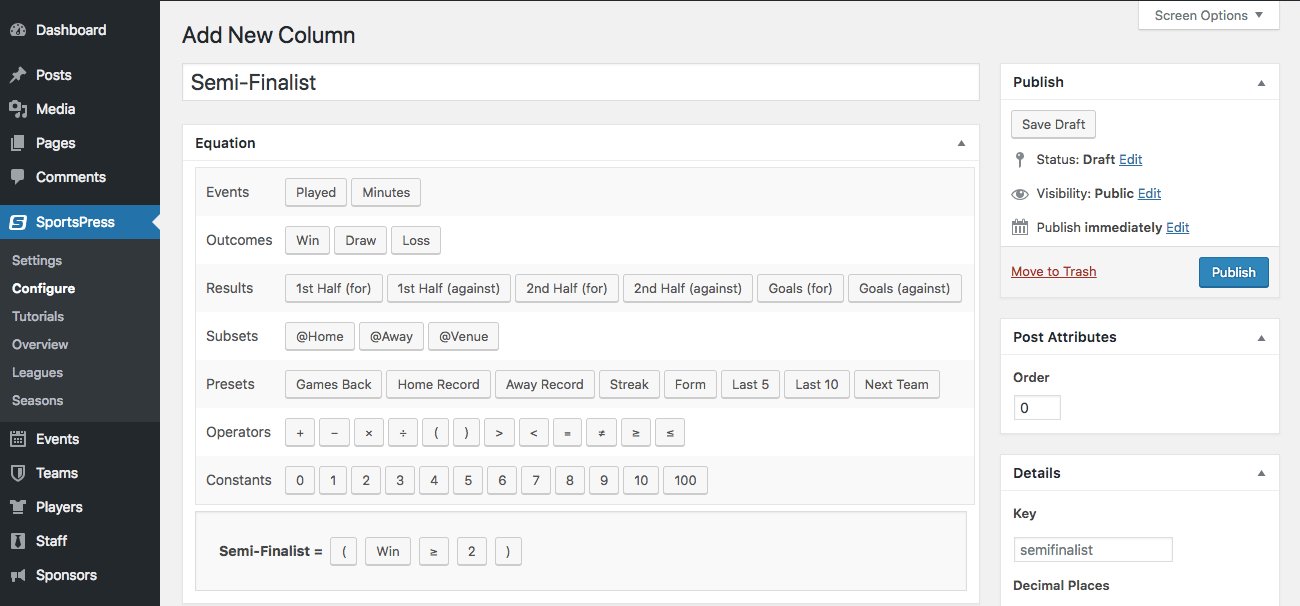
You can create whatever equation you want using the variables and operators provided.
Make sure you click Publish to integrate the new column into your League Table.
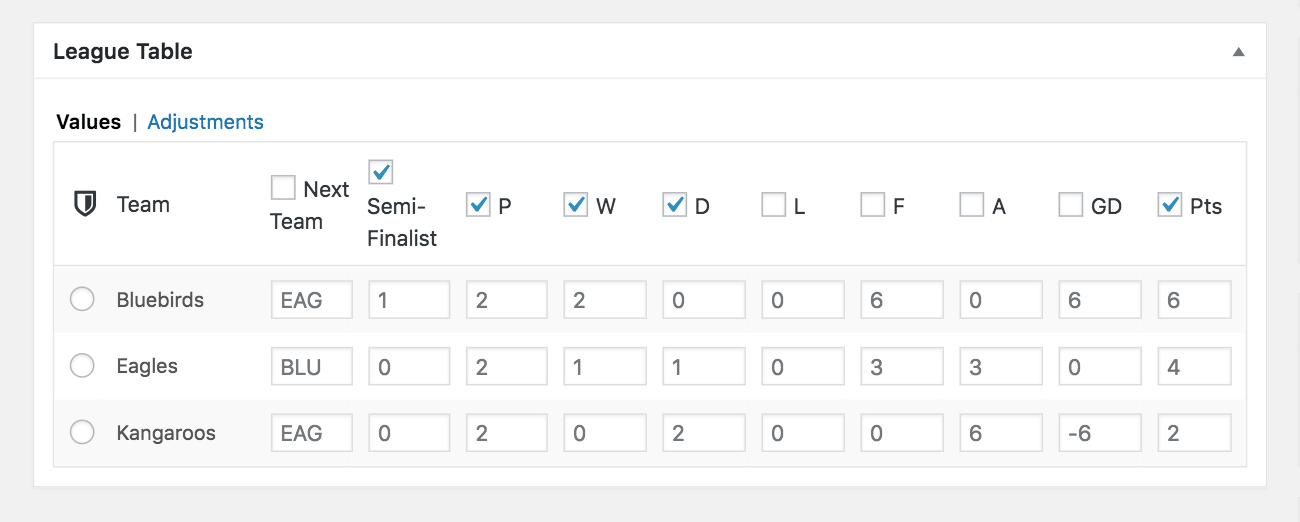
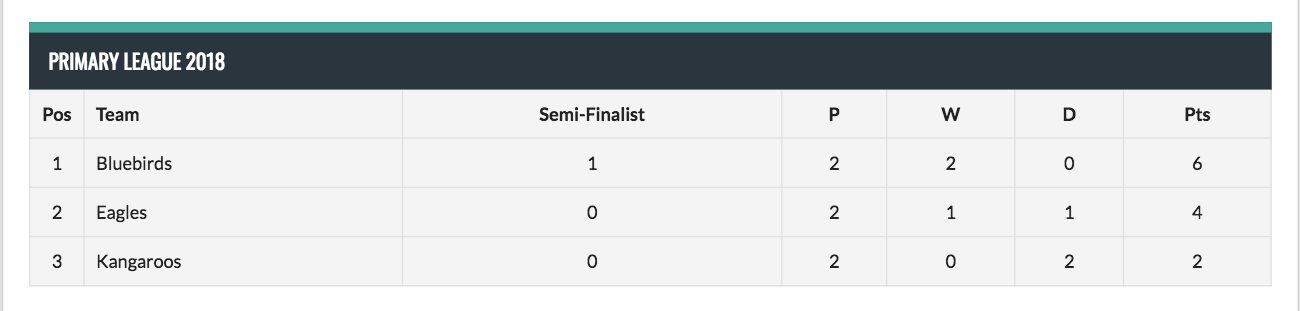
To view how the data populates, go to Dashboard > Teams > League Tables and select the League Table you want to edit.
In the example below, the Bluebirds are the only team with two or more wins so they have a semi-finalist ranking.
It may also be important to note that the equations only draws from the statistics provided in the actual events and not from manual input in the league tables.
Select View League Table to see the front end of your website and the fruits of your labor.
Where to Use Conditional Equations
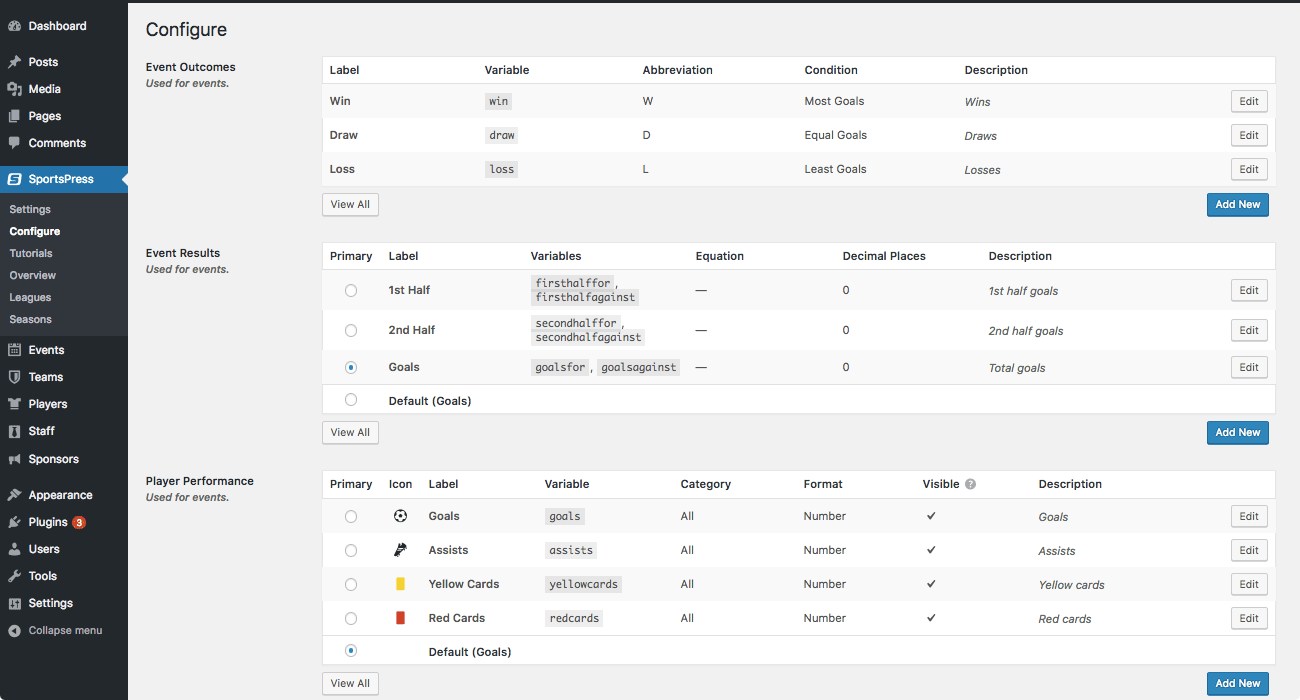
Equation functionality is available with Player Performance, Table Columns and Player Statistics. There are a variety of different elements to play around with to create equations, which can be useful for leagues that have variant scoring systems.
When creating your own conditional equations for various scenarios, remember that they’re there to determine the relationship between variables. They’re also helpful for categorizing players in special tables.
Configuration Opportunities
Here are the modules on the Configure page where you can utilize conditional equations:
- Player Performance – Player Performance statistics populate into an individual event and offer specific player details from the game. They can also be integrated into Player Statistic equations.
- Table Columns – Table Column team statistics populate any League Tables you want to create. They’re useful for showing upper tiers of a tournament or categorizing performance in an entire league.
- Player Statistics – Player Statistics are the individual stats used in Player Lists, which can be created internally in a team or across an entire league. If you wanted a player list of players across the league who all have above average scores, just create a Player Statistic.
The opportunities to utilize conditional equations are as numerous as you make them. You can recreate complex scoring details in your sport that weren’t possible before or go rogue and create your own system. You can even develop tracking statistics for your individual league as a way for players to aim for a particular level of excellence.
Configure That
Paying attention to the minutiae and caring about the specificity of the game might seem like overkill to some, but far from it. You’re taking pride in the game and bringing the full experience to your fans, whether it be through event details or imaginative conditional equations.
Have your fans been clamoring for more event details? What complex statistic are you excited to implement? Can you think of any other helpful additions to the custom equations module? Let us know over on Twitter or Facebook.
