How to Add and Attract New Sponsors to Your Sports WordPress Site
Getting sponsors for your sports WordPress site is as easy as finding and trapping a leprechaun. Or is it? When it comes to WordPress, you can use SportsPress Pro to swiftly and effortlessly attract new sponsors.
Gaining sponsors for your sports WordPress site can be a mutually beneficial arrangement. Your team can get the supplies they need while your sponsors can advertise their business.
Signing up some sponsors doesn’t have to be difficult. With WordPress and SportsPress Pro, you have many options to offer sponsors and for free.
Here are more details on sponsorship as well as how to attract sponsors to your sports WordPress site using the tools readily available when you use SportsPress Pro with WordPress for your sports website.
Sponsorship: What is It Good For?
Not absolutely nothing, that’s for sure. Gaining sponsors for your sports WordPress site can not only benefit your site and your teams, but it also benefits your potential sponsors.
You get money for supplies like your website, jerseys, the game ball, transportation, refreshments and anything else you need. Your potential sponsors get positive exposure for their brand and business through advertising you can initiate.
Having some sponsors on your belt is a great way to help fund what you and your team needs, but you also need to know what you can give back.
That’s where creating sponsorship packages can help. You can create tiered sponsorship packages based on a balance between the different forms of advertising you can provide to your sponsors and the level of contribution they can provide.
For details, check out How to Find a Sponsor for Your Sports Team or Sporting Event.
But how do you know the kinds of advertising you can provide to your potential sponsors? You can find built-in advertising options for your sponsors when you use SportsPress Pro and it’s outlined in detail below.
Sponsor Setup with SportsPress Pro
With SportsPress Pro, you can create sponsors and display them in many ways on your sports WordPress site. In fact, not only can you create a website for your sports club or league, but you can also create a full-blown tournament website.
The SportsPress Pro plugin can create a burly sports WordPress site or tournament website complete with scoreboards, player and staff profiles, automatic score calculations with equations and everything else you need.

With all that in mind, below are several ways you can provide advertising benefits to your sponsors for free.
Creating a Sponsor Profile
After you have set up SportsPress Pro, you can create profiles for your sponsors in a few clicks.
Go to Sponsors > Add New and enter in a title, which is the name of your sponsor that you want displayed on the front end.
Next, add a description in the text editor. You can add anything you want here such as promotional material and text.
Additionally, you can also choose to include the sponsor’s contact details, a coupon code or a special offer.
Don’t forget that you can edit text as you normally would for WordPress posts and pages so you can further highlight important details. For example, you can add the sponsor’s slogan or mission statement as a heading or blockquote.
These can all be an added incentive for attracting new sponsors.
You can also edit the permalink if you want and it works just like it does for WordPress posts and pages.
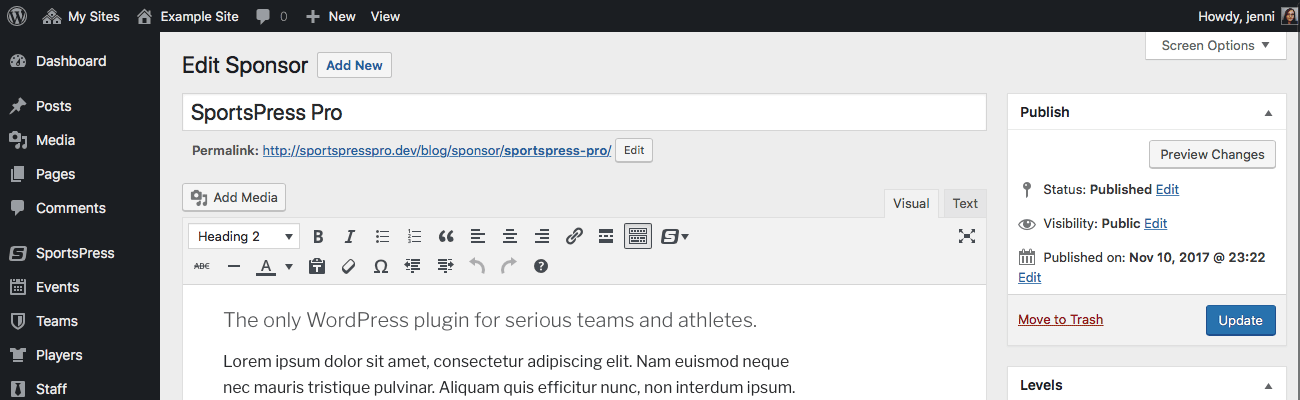
When you’re happy with your changes, click the Publish button on the right-hand side of the page. Alternatively, you can click Save Draft if you’re not quite ready to show off your new sponsor page to the public.
Setting Up Additional Sponsor Details
There are also other options available to further help you promote your sponsors.
On the right, you should see a few sections with additional settings:
- Levels – You can display sponsors in a list using the Sponsor widget while also organizing them into specific groups. You can find details about this later on.
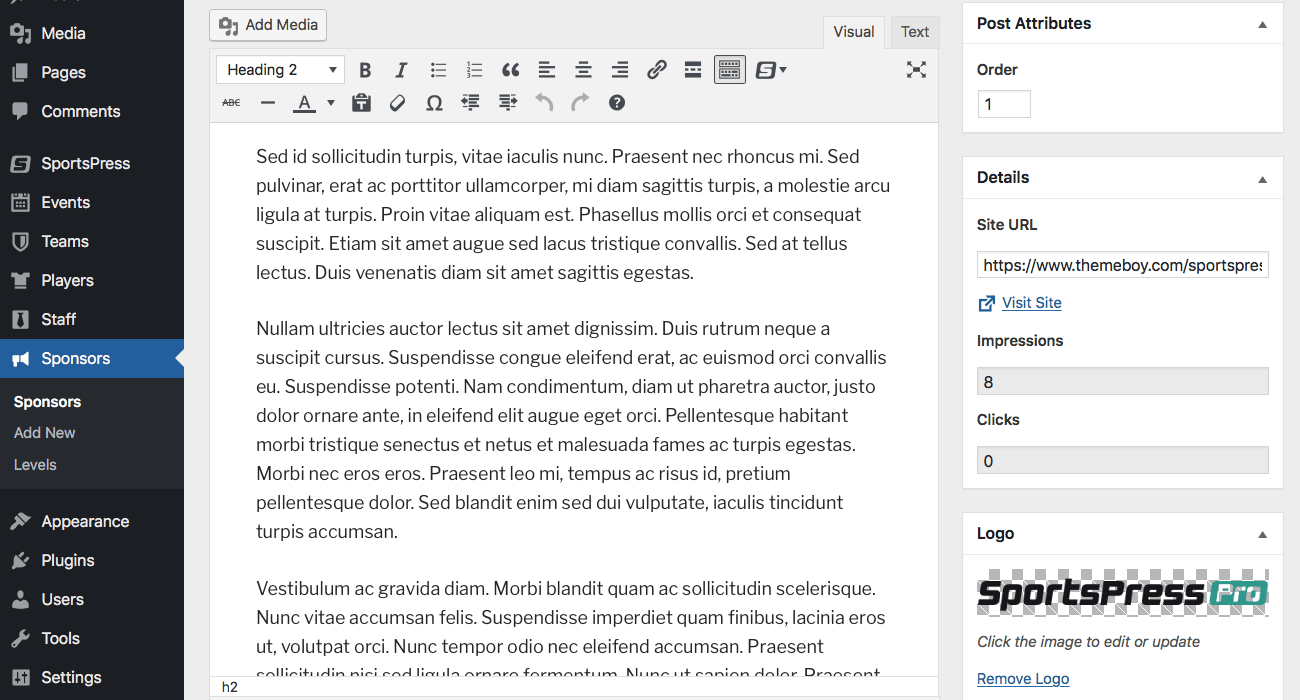
- Post Attributes – You can enter a number in the Order field to organize your sponsors so they are displayed in a specific order when you list them using the Sponsor widget. Sponsors that are numbered with zero have higher priority and are displayed before sponsors that are ordered by any other number.
- Details – Enter a link to your sponsor’s website.
- Logo – You can upload a logo for your sponsor through the WordPress Media Library and add it to the page.
You can also see analytics for your sponsor page. In the Details section, the Impressions field displays how many people viewed the sponsor page you’re working on after it has been published. The Clicks field shows how many people clicked the link to view your sponsor’s website.
These are particularly useful if you share these numbers with your sponsors. That way, they can better measure their return on investment when they became a sponsor. It’s something else you can offer in your packages to help attract new sponsors.
Displaying Sponsors with a Widget
Using the Sponsor widget, you can display a list of your sponsors in your sidebar and also in your header.
Three sponsors are displayed in your site’s header. The alignment depends on the theme you’re using.
The sponsor widget can be placed anywhere in your theme that’s widgetized such as your sidebars and footer. If you use a plugin like Custom Sidebars, Content Aware Sidebars or WP Custom Widget Area you can place the widget anywhere you want in your pages and posts. This is optional, but it gives you the ability to display a list of your sponsors in multiple places on your website.

Creating a Sponsor Widget Area
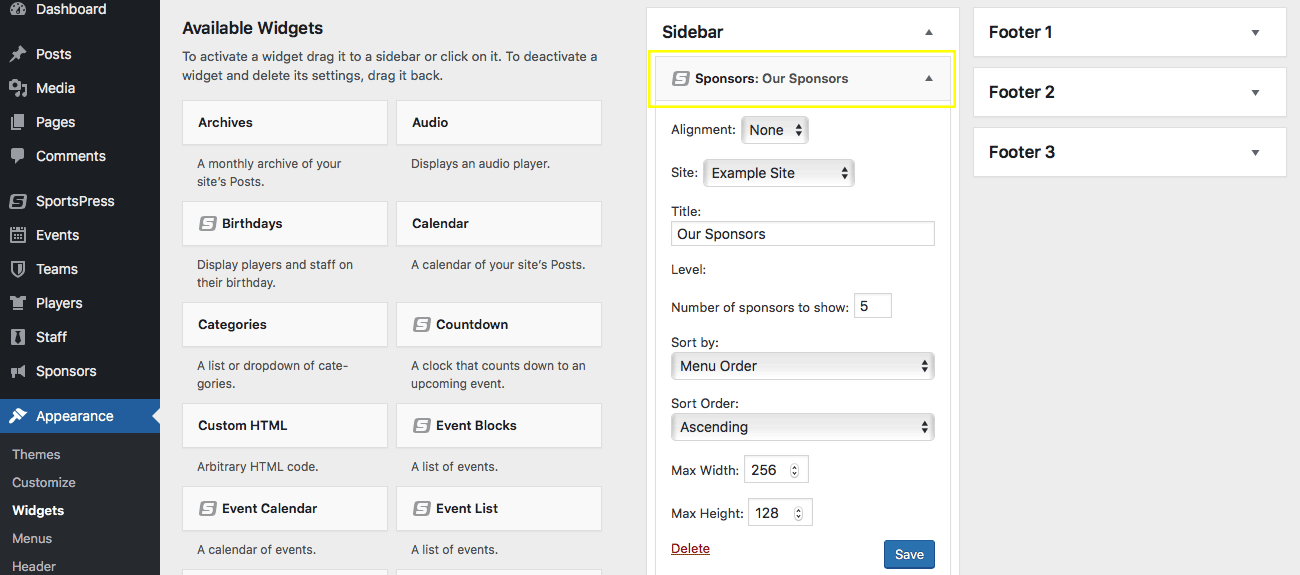
To create a widget that lists your sponsors, go to Appearance > Widgets. Find the widget in the list on the left called Sponsors. Click on it, then drag it to the widget area where you want your sponsor logos to appear, then release your click.
You can configure the following options:
- Alignment – How you want content in the widget to be arranged. You can choose from None, Left and Right.
- Site – If you have Multisite enabled, you can choose the website where you want your widget to appear.
- Title – This is the title that’s displayed at the top. You can type something like “Our Sponsors,” for example, or whatever you want.
- Level – You need to create a level to choose one and this is covered later. For now, just know that you can create a tiered system to display your sponsors. For example, you can create a level for platinum-tier sponsors who contributed the most money and display other sponsors on a different level like gold or bronze.
- Number of sponsors to show – You can enter the number of sponsors you want displayed at one time.
- Sort by – You can choose the order in which sponsors are listed: menu order, random, by date or by name.
- Sort order – Choose whether the list should be shown in ascending or descending order.
- Max width – This option lets you enter the maximum width for logos. That way, if some logos are larger, they’re resized to the width you type here.
- Max height – Similar to the above option, you can also enter the maximum height in which logos are displayed.
When you’re done, click the Save button so your new widget area is shown on the front end of your website.
Tiered Sponsors for Extra Exposure
As mentioned earlier, you can create levels for your sponsors so their logos are displayed in a tiered system. For example, you can create a level for sponsors that contributed the most money so that you have the option to display their logos higher on the page, thereby increasing their visibility.
This is another incentive that you can include in your sponsor packages.
Go to Sponsors > Levels and enter a name. This can be anything you want such as “Platinum Sponsors,” “Tournament Sponsors” or “Game Sponsors.”
Next, enter a slug, assign a parent term and a description. These work exactly the same way as the inherent WordPress categories. For details, check out How to Add Categories in WordPress.
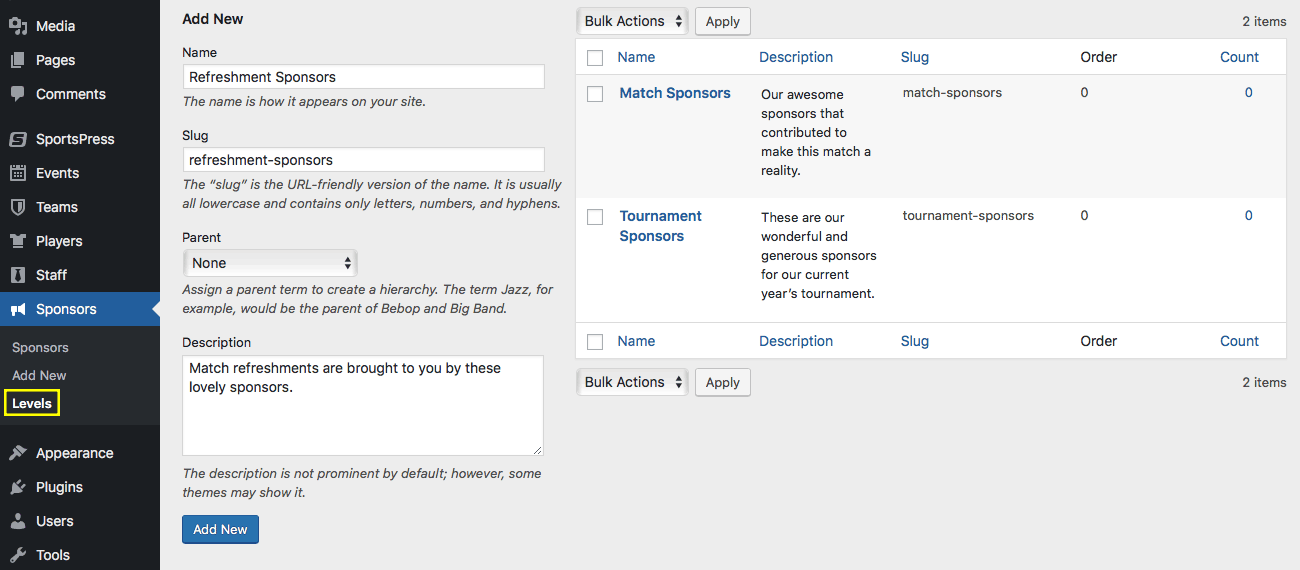
When you’re done, click Add New.
Continue adding as many levels as you want. When that’s done, you can display these tiered sponsor levels using the Sponsor widget.
Adding Levels to Widgets
Go back to Appearance > Widgets, then drag and drop the Sponsor widget to one of the areas of your website on the right.
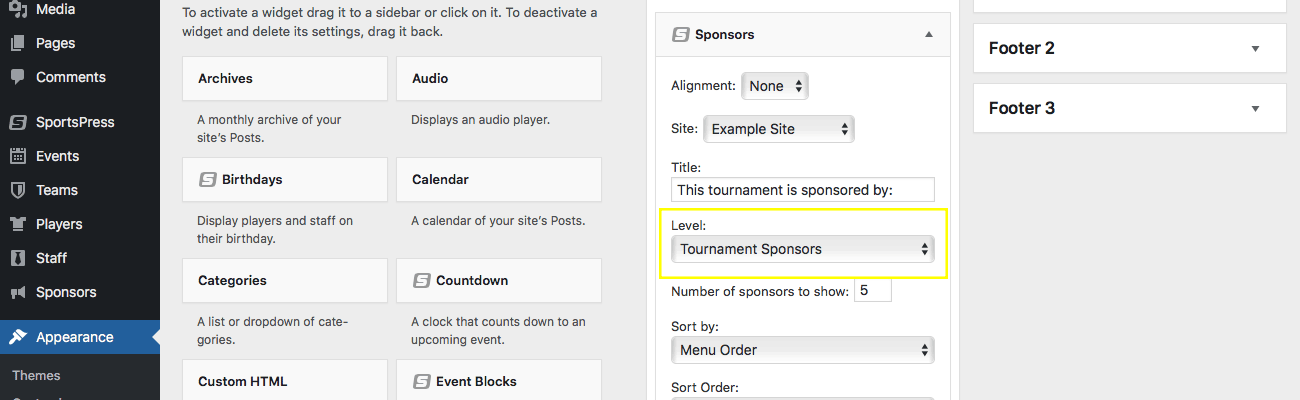
Follow the steps outlined above to adjust the options, with the exception of the Level setting.
Now that you have created at least one level, a drop down box appears under the Level option of the widget. Choose one of the tiers you created from the list. Then, don’t forget to click Save.
Adding Sponsors to a Level
You have levels set up now, but none of your sponsors are going to show up on the front end of your website until you assign sponsors to a level.
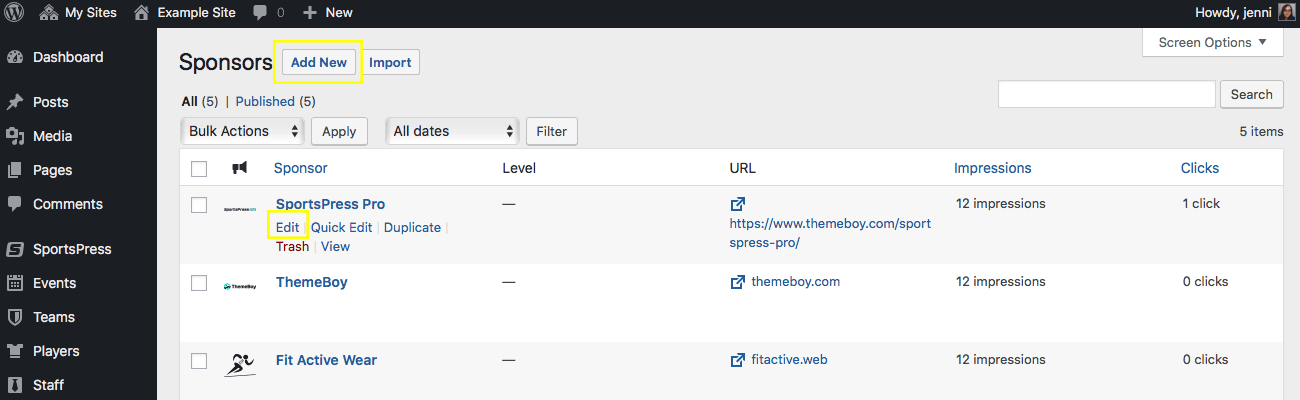
To do this, go to Sponsors > Sponsors and hover over one of the names on the list, then click Edit. Or, you can create a new sponsor by clicking on Add New at the top of the page.
On the right side of the page, there’s a section called Levels that was touched on earlier. You can check one or all of the boxes for the levels. The one you select will display the sponsor on the front end, but only for the widget area where that level is chosen.
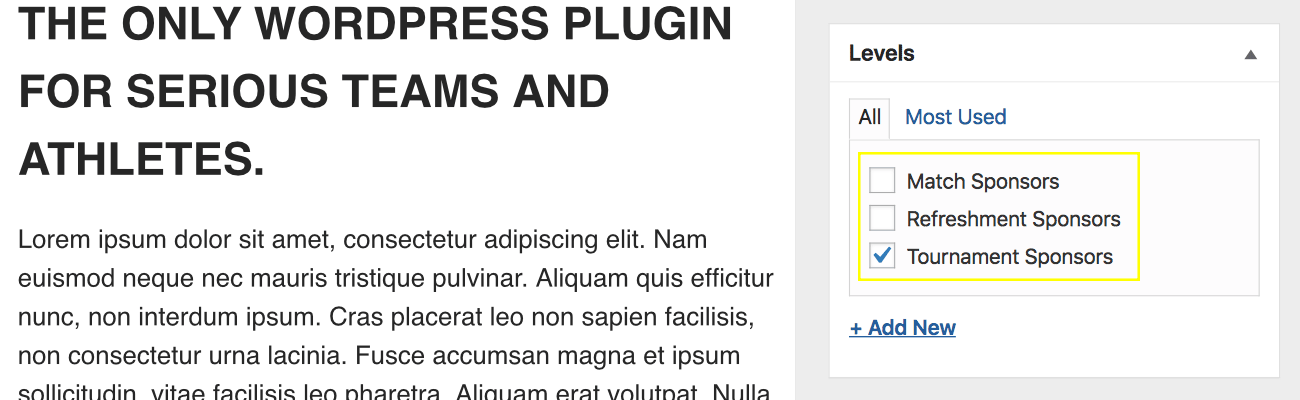
When you’re done, click Update or Publish to save your changes.
It’s a Win-Win-Win Situation
When you add sponsors to your site, they win, you win, the team wins and just maybe for real at the next match. That’s because attracting and adding sponsors to your sports WordPress site can help you support your efforts and your teams.
Now you know how to add sponsors to your website and what you can offer them in in terms of advertisement. You didn’t need to spend another penny to boot!
There’s also more you can offer your sponsors as well. For details, check out How to Find a Sponsor for Your Sports Team or Sporting Event.
How do you plan on attracting and adding sponsors to your sports WordPress site? What kinds of features would you like to see in SportsPress Pro? Share your thoughts with us on Twitter or Facebook.
